

 I just recently talked with a sea kayaker in Chicago who described an incident at Cape Fear in North Carolina. Garrett showed me some photographs of a rough sea and proudly explained how he had paddled right out through all the breakers and then sat marking time,
 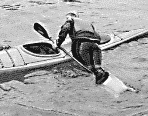 punching through each wave as it came.
He was fine until he turned toward shore, when a wave unbalanced him, and he capsized and failed his roll in the rental kayak he was using. “I rigged up my paddle float and fitted the paddle beneath the bungies behind the 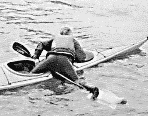 cockpit, but every time a wave hit me, the paddle sheared around alongside the kayak like a pair of scissors closing and I capsized again.
After three unsuccessful attempts, I realized that it was just not going to work.” At that point, he decided he was wasting 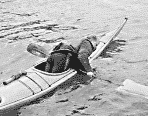 his time trying to climb back in, and that he had better swim for shore. His account made me think about self-rescues, about the dependence of many paddlers on equipment rather than on paddling skills and their reliance on self-rescue rather than group rescue. I see so many kayakers carrying an inflatable paddle float on their deck alongside a stirrup bilge pump. But I wonder how many of those paddlers have practiced in the kinds of waters they would capsize in? How many others, like Garrett, believe that self-rescue is not possible in rough water?
What is a paddle float?
The paddle float is a buoyant accessory that fits onto a paddle blade to create an outrigger for additional stability during reentry. Many sea kayakers in the U.S. carry them on deck.
I had a look at what different paddlers were carrying. The most common paddle float is an inflatable mitten that pulls over the paddle blade. In effect, this is a double envelope that squeezes tightly onto your blade when you inflate it. A short tube for oral inflation is fitted with a mechanism for closing the tube, either by twisting or by pushing in, depending on the style. The bag itself is normally either a waterproof nylon or vinyl.
The nylon is more durable but more expensive. Also featured on these paddle floats are eyelets by which you can attach the float to your paddle or to your deck. Some have a nylon strap already fitted for this. Floats with two air bags are better than one.
The first paddle float I bought to try, years ago, split one day when I was fitting the blade into the envelope, and since it had only one air chamber, it was rendered useless. The other popular choice is a float made of minicell foam fitting. Most of the foam floats I saw were homemade.
They are more bulky to carry and store, but unlike inflatable paddle floats they cannot split. And because they don’t require inflation, they’re quicker to use. You can even use them for a paddle float roll without having to bail out. Some manufacturers supply paddle floats, either foam or inflatable, that do double duty as seat backs.
Choosing a float and preparing it for use
You need to consider the size and shape of your paddle blade when purchasing a float. Not only must your blade fit into the pocket provided-and some pockets I tested are too narrow for broad blades-but the float must stay attached when in use.
Check that your float fits your paddle blade and inflate it (if required). The float should be securely attached to the blade. It is essential that the float is fastened by means of a strap or line around the throat of the blade. Otherwise it will probably be pulled off in waves, so modify your float if necessary with a short line and quick-release clip.
When paddling, secure your float somewhere on your kayak where it can easily be reached. Deck elastics alone are not adequate in surf conditions unless the float is additionally tethered. Storage behind the seat is fine, as long as the float is fastened in.
When you need to use it, you will be out of your kayak anyway so access will be easy. You may decide that straps across the rear deck or bungies to hold the paddle in position during the self-rescue are a good idea, but if you choose bungies, bear in mind what happened to Garrett: the connection between the paddle and the kayak may not be as positive as it needs to be in rough water.
Also be aware that any rescue that relies on particular deck fittings on your kayak might not be appropriate if you paddle a rental or borrowed kayak.
The self-rescue
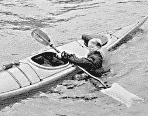
Now for the paddle float self-rescue. You will need to hang onto your kayak, either by threading an arm beneath a fixed deck line or by hooking a leg into the cockpit. First secure your paddle float to the blade. Inflate at least one of the air bags and make sure that the valve is closed.
Probably the most awkward stage in setting up for a self-rescue in choppy water is fitting the float onto the paddle blade. Inflatable floats show a tendency to cling closed when wet, making it difficult to slip the blade inside, and this, combined with the jolting of the water, can make this stage of the procedure time-consuming.
Hold the paddle shaft across the rear deck immediately behind the cockpit coaming so that the end of the paddle with the float extends right out past you onto the water at right angles to the gunwale. You should be in the water aft of the paddle.
This works fairly well with a kayak with a flat back deck but is less secure with a curved deck. Some paddlers I spoke to like to have straps on the back deck to hold the paddle in position, making a fixed outrigger of the paddle float, but others prefer to grasp the paddle against the back of the cockpit, which makes it easier to retrieve the paddle after reentry.
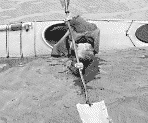
Kick your legs to the surface and slide yourself facedown across the stern deck, pushing the kayak down beneath your chest. Quickly hook your feet over the paddle so that part of your weight is supported by the paddle float. Lie facedown on the rear deck with your head toward the stern and lift one foot at a time from the paddle into your cockpit.
At this point you should still be pinning the paddle to the deck, with the hand grasping around the cockpit coaming and paddle shaft. Keep your weight shifted slightly to the paddle float side of the kayak. Move your outside hand (the hand away from the paddle float) to the side the float is on and reach around your back with the other hand to grip the paddle on the outside. Keep some weight on the paddle float and swivel toward the float into your seat. Keeping the float on the water for stability, lift the other paddle blade over your head and reposition it across your lap.
Now you can press the paddle shaft down against both sides of the cockpit to maintain stability while you bail. The easiest way seems to be to use your elbows to pin the shaft beneath the front of your PFD. Although a foot-operated bilge pump provides for hands-free bailing, and even a deck-mounted pump leaves one hand free for holding the paddle for balance, in the U.S. a hand pump requiring both hands to operate appears to be the style most commonly carried. Bailing in rough conditions is futile anyway until the spray skirt is replaced, but attaching the skirt to the coaming requires two hands and there is a fair chance that the conditions that led to the initial capsize will overturn you again.
The final stage is to remove and stow the paddle float-a difficult task in rough water because you’re trying to brace and handle the float at the same time. An alternative rescue that works well with a large cockpit is to slide across the rear deck as before but swivel facedown, head toward the bow, and straddle the deck with legs wide in the water to either side of the kayak.
Extend your paddle for support, drop your butt into your seat and bring your legs in one at a time. You can use this same method with a small cockpit, but it is a lot more difficult because you will have to sit on the back deck, in an unstable position, in order to slide both feet into the cockpit.
Use your paddle with float as a stabilizer by gripping it tightly across both sides of the cockpit, keeping some of your weight on the float for balance. It is likely you’ll have to hold the shaft in the crook of one elbow and brace, so that your other hand is free to help you slide in.
What to do in rougher conditions
Enter your kayak from the upwind side. Trailing the drifting kayak will help you keep your legs high. If you try to reenter from the downwind side, your legs will end up beneath the hull as it blows toward you.
Once you have reentered the kayak, you will need to continue to brace on the upwind side, into oncoming waves for security. Make your movements swift but smooth. The fewer waves that hit you while you are getting back into the cockpit, the greater your chance of success.
Some paddlers advocate partly filling a rescue float with water so that it cannot easily fly up into the air when the kayak lurches in the waves and throws your weight to the side of the kayak not supported by the paddle float.
On trips this means that the paddle float can double as an extra fresh water carrier. It won’t be as compact to stow, but the weight certainly makes the float a little more stable in choppy water. I recently set up a self-rescue scenario with a group of competent paddlers on calm water.
Those paddlers choosing a reentry and roll were upright within fifteen seconds, at which point none of those using a float had finished fastening their floats to their blades. The quickest paddle float rescues on that occasion ran almost two minutes (in calm conditions), not including removing the float, bailing or replacing the spray skirt.
The same paddlers accomplished assisted rescues in less than a minute, including emptying the kayak and replacing the spray skirt. The paddle float rescue, even when it works, keeps the paddler in the water for a significantly longer time than the other methods.
To sum up
Paddle floats are a useful aid to the solo paddler who capsizes and fails to roll, but in most situations where this might happen should the paddler really be paddling solo?
When paddling with others, the float rescue is a poor substitute for an assisted rescue. If you trust the float rescue to save your life while paddling alone, you’d be foolish to venture out in conditions in which your self-rescue is untested or unreliable.
Practice your self-rescues regularly and always check that your paddle float is in working order before you go.
The only paddlers that I found who could show me a quick and effective float rescue were those who had practiced it a lot. The main limitation to this kind of self-rescues your own skill.
What one person can do with a paddle float, another can find impossible. You will have your own limits. Garrett exceeded his limits at Cape Fear.
As a footnote
What do I consider the most effective self-rescue using a paddle float? My vote goes to the reentry and roll. And as a back up for Eskimo rolling, not as a substitute for it.
 While the paddle float was devised as a way to improvise an outrigger for self-rescue, its best use, in my opinion, is as an aid to a reentry and roll. Once the rudimentary principles of a roll are mastered, a reentry and roll with a paddle float can offer a reliable self-rescue, even though rolling without the float might still
 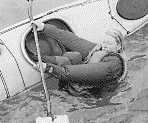 be elusive.
For a reentry, flip the kayak upright, float yourself alongside the kayak facing the bow, and grasp the paddle against the far side of your cockpit so that it extends out at right angles past you with the float as far 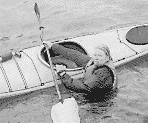 from the side as possible. Grip the near side of your cockpit with your other hand. Lie back in the water. Hold your breath and swing your feet into the cockpit between your hands. Still gripping both sides of the cockpit, wriggle yourself into your seat, and with your feet on the foot braces, grip firmly with your knees.
Now 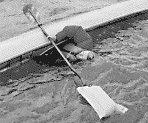 grasp the paddle shaft with both hands and gently pull down against the buoyancy of the paddle float until your head reaches the surface and you can breathe and see what you are doing.
Relax now in this position. Finish your roll by pulling down on the paddle with the hand closest to the paddle float, pushing your head down toward the water and flicking with your hips to right the kayak. When the kayak is upright, bring your head inboard close over the deck. Maintain your balance with the aid of the paddle float by gripping it tightly across the cockpit coaming.
As with the previous paddle float self-rescue, in windy conditions or in waves or surf, enter from the side the waves are approaching from so that you are bracing on the correct side once you are upright.
If you practice the reentry and roll with a paddle float and find it straightforward, try deflating the float a little. The less buoyancy you need in the float, the more efficient your hip flick is becoming. Ultimately you might aim to be able to self-rescue without a float, but then you can still carry the float as a back-up in case you need it sometime.
Of course practicing a roll with a paddle float is a good way of gaining confidence for rolling without a float. It is also an excellent way to improve your hip flick until it is almost effortless.
Use the float for practicing paddle braces until you can brace with confidence and can progress to bracing without a float with no fear of failure. Regularly using a paddle float increases your familiarity with it and helps you gauge its advantages and limitations for yourself.
To improve your sense of balance, try reentering without the paddle float, going through all the moves on calm water. Then rehearse with your float in varying conditions until you know what you are capable of with a float rescue.