
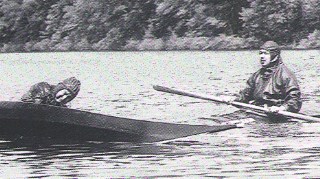
 The paddle bridge requires the kayaks to be nearly parallel and just far enough apart to rotate the victim up between the kayaks.
Several articles have appeared recently on the subject of capsize rescue technique. My concern is that the wet exit and reentry method has become widely accepted in training programs as a first option for rescues. It should be the last thing to try, because it puts a capsize victim and others at unnecessary risk. I recall having written decades ago about the lessons that we might learn from traditional kayakers who developed rescue methods that have stood the test of time:
In rescue, especially at sea or in lakes, the kayak should never be abandoned and need not be if all members of a group know Eskimo rescue methods. Cold water quickly saps the strength of even expert swimmers, and the time spent in practicing climbing back in a kayak would be far better spent in Eskimo rescue practice. (“The Kayak of the Eskimo,” American White Water, August 1961)
It is sad to realize that in the thirty-six years since this article appeared, several kayakers have been born, lived their entire lives and died after making wet exits. They might still be alive if they had known Eskimo rescue technique. My impression from reading accident reports is that most capsize fatalities occur after the victim makes a wet exit.
George Gronseth, who has authored many of Sea Kayaker’s accident reports, estimated that only a very small percentage-say, one or two percent of the victims in fatal capsize accidents-are found inside their kayaks. The rest are found in the water, or missing. Those found in their kayaks probably panicked or, in at least one case, caught their footwear inside the kayak.
Panic can result in a fatal accident, regardless of whether one is in or out of a kayak. I believe the most important obstacle to overcome in kayak training is the fear of being upside-down underwater. The trauma of a capsize begins with the shock of sudden immersion.
Then there is the discomfort caused by hanging head down in the water. Water pressure on the nostrils is hardly noticed when swimming underwater, but it can be painful when upside-down. There is also the fear of entrapment that makes us want to get out of the kayak immediately, while we still have enough air to reach the surface. If we can control the fear that makes us want to bail out, we can find better ways to survive than wet exits.
The subject of avoiding wet exits was addressed in an article entitled “Please Remain Seated,” Sea Kayaker, summer 1990. It described various float and snorkel arrangements that would permit a capsized kayaker to remain in a kayak to roll up or part way up in order to breathe and avoid panic until he or she could be reached for an Eskimo rescue.
How paddlers adjust to underwater activity is greatly influenced by the type of training they receive. As an extreme example of the type of discipline needed underwater, consider that required in military special forces training.
The August 1996 issue of Life magazine contains photographs that should inspire all sea kayakers to learn how to control fear underwater. It shows U.S. Navy Seals training in a swimming pool. To qualify as Seals, they must tread water for ten minutes before retrieving their masks from the pool’s bottom with their teeth. But, they must do all of this with their hands bound behind their back and their feet tied together!
Fortunately, most of us do not have to qualify as Navy Seals. There is a much easier way for a kayaker to learn to control fear underwater. In 1985 and again in 1992, I attended kayak training classes in Greenland.
Before Greenlanders are taught to roll, they put on their kayak jackets, which are fastened around the cockpit, wrists and face. Then, without a paddle, they lean forward with their faces near their decks, wrapping their arms around the sides of their kayaks so that their hands are on the bottoms. Keeping the face near the deck makes the kayak easier to roll and reduces water pressure on the nostrils.
The instructor, wearing boots or chest waders, stands at the bow of the kayak, grasping it, with one hand at the pointed bow and the other at the forefoot, or forward end of the keelson, so he can turn it over and right it again. When the student says he or she is ready, the instructor turns the kayak upside-down. After a few seconds, the student drums his fingers on the bottom of the kayak and is immediately righted by the instructor.
The simple lesson here is that the student, who is in complete control of how long he or she wishes to remain under water, develops confidence. The time that panic-control training buys can be used to drum loudly against the bottom and sides of the kayak while moving the hands vigorously to attract attention. By dog paddling to the surface occasionally, the victim can get a quick breath of air, then duck under to conserve strength while holding both hands up and waving them along the sides of the kayak.
If no help is nearby, the victim has a time-tested Eskimo rescue method available, even though no paddle is at hand. This is a roll that uses the buoyancy of a float.
The Avataq Roll
The Greenland hunting float, or avataq, is carried on the afterdeck. One end of the harpoon line is attached to the seal skin float, so that it can be thrown overboard to act as a drogue for a harpooned seal. In an emergency, it can be used for rolling up if the paddle is lost. A fully inflated paddle float can be carried on the afterdeck and used as a substitute for the avataq.
To roll up on the right side, hold one end of the float in the left hand beside the right knee. Hold the other end of the float in your right hand beside your right hip. Keep a lengthwise tension between the hands as if expanding an accordion. To initiate recovery, pull down toward the face sharply with the left hand, leaning aft as the float clears the front of your torso, then lean forward as you become upright.
At the finish, the left hand will be beside the left hip, and the right hand will be beside the left knee, in a mirror image of the starting position. The hips and trailing knee must rotate the kayak as you roll, and you must coordinate the torso movement so as not to lean forward too quickly. Extend the float outward if more lift is needed for the recovery.
Try practicing this at home on the floor until the movement becomes automatic. Holding a pillow to simulate a float, pretend you are upside-down, and move the pillow from your right side to your left to learn the start and finish positions. Without releasing your grip on the pillow, try a “roll” in the opposite direction by reversing the hand movement.
Bow Rescue The simplest of assisted rescues is for the capsize victim to grab the bow or stern of a nearby kayak to pull himself or herself upright. The reason for grabbing the end of the rescuer’s kayak instead of the middle is to avoid capsizing the rescuer. It is preferable to use the bow so that the victim is in full view of the rescuer.
If the victim paddles to the surface for a breath and sees another kayak parallel to his or hers, but out of reach, he can move toward the rescuer’s kayak by dog paddling to the side while still inside the kayak. This might be the quickest way to reach a nearby kayak if it is pointed the wrong way to be easily maneuvered toward the victim.
With the victim still in his kayak, the rescuer can administer CPR from a sitting position.
 It’s also better for the rescuer’s kayak to be parallel to that of the victim to prevent a collision, and allow the rescuer to grasp the bow or stern of the victim’s kayak. By holding the bow and bridging his or her paddle across both kayaks, the rescuer’s bow is automatically at or near the victim’s hand. Another advantage is that the rescuer can keep the bow from swinging out of reach during the rescue by moving the lower body.
This method was popular at Ammassalik, East Greenland, in the early 1930s, when two Gino Watkins expeditions were there. The book Northern Lights illustrates this rescue. It is also shown in motion pictures made during the Watkins expeditions.
When used at roll practice, the instructor can be in alignment for a parallel bow rescue, yet well out of the way so that paddling alongside can be done within seconds if a student signals for help. When traveling in a group, an experienced kayaker can follow behind and slightly to one side of a paddler who is more likely to capsize. This same applies to other rescues performed with the kayaks parallel to each other. Being in the right formation, especially when making wide crossings, can save much time in an emergency.
The Paddle Bridge Rescue
The bow rescue requires that the victim is able to grasp a bow and pull himself or herself up. A capsize victim who is exhausted or unconscious can still be rescued by one kayaker. If an unconscious victim and rescuer are facing, it is even possible to reach underwater and pull the victim’s head up and across the foredeck of the rescuing kayak. This position makes mouth-to-mouth resuscitation possible without unsealing the spray apron of either kayak.
The paddle bridge requires the kayaks to be nearly parallel and just far enough apart to rotate the victim up between the kayaks. The rescuer makes sure that the paddle is firmly across both kayaks with allowance for the victim’s kayak to roll under the paddle.
The rescuer then uses one hand to hold the paddle as a bridge across both kayaks while keeping the other hand free to assist the victim. An illustration and description of the paddle bridge rescue appeared in Fridtjof Nansen’s book, Eskimo Life, published in 1891. It and the other rescues described here probably evolved over many centuries.
Storm Rescue
In stormy seas, a paddle placed as a bridge across two kayaks could slip out of position and cause the rescuer to capsize, so it is more secure if the rescuer pulls alongside so that the two kayaks touch. Then, extending his or her paddle farther across both kayaks, the rescuer reaches across the victim’s kayak to grasp the far gunwale.
Once the kayaks are securely held together, the rescuer can extend his or her paddle farther across the victim’s kayak to reach the opposite side. Thus the paddle is across the foredeck of the rescuer’s kayak and cantilevered beyond the opposite side of the victim’s kayak. Then the victim can chin up on the outboard side of the catamaran formed by the two kayaks. As the victim rolls up, the rescuer allows the victim’s kayak to rotate under the paddle bridge.
In the storm rescue, the victim can help keep the kayaks together in rough seas by chinning up on the rescuer’s extended paddle from the outside.
An advantage of this rescue is that the victim helps keep the kayaks together as he or she rolls up. A disadvantage is that the kayaks bump together as the capsized one is righted, which might cause hull damage to the kayaks or minor injury to either kayaker. In an emergency, this risk is insignificant, but care should be exercised in practice.
This rescue should only be used with strong paddles, because there is greater bending load on the cantilevered paddle than there is in a paddle bridge, which supports the paddle at each end. In practicing this maneuver, the rescuer should relax pressure on the paddle at the first sign of excessive bending.
“T” Rescue
If the rescuer’s kayak is not in position for a parallel rescue, but the victim’s bow can be reached, the rescuer can pull the bow of the victim’s kayak across his or her foredeck, and twist the capsized kayak so the victim can at least get far enough upright to breathe and rest while awaiting further help. It is important for the victim to lean forward and wrap his arms around the kayak to make it easier for the rescuer to rotate it upright.
The Greenland “T” rescue enables a capsize victim to breath and avoid panic until further help can be given.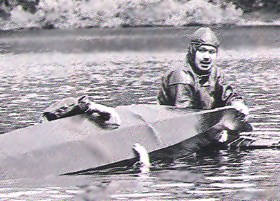 There are also Eskimo rescues for extreme situations, where a kayaker might get out of the kayak and have to be carried piggyback on someone’s afterdeck. This is extremely dangerous in cold water. There was a poignant story told by Dr. Alfred Bertelsen, a medical researcher in Greenland around 1900. Three brothers were out hunting in kayaks when one of them capsized. He exited his kayak after failing to roll up. His brothers managed to get him up between them, but he froze to death in their arms.
These half dozen rescues will see a group of kayakers through many emergency situations. It is crucial to have practiced them as a team before an emergency develops. Each person should take turns being the rescuer and the victim. It is prudent to practice these rescues under varying sea conditions.