

Except for the PFD, a kayaker’s most basic piece of safety equipment may be the hand-held, hand-operated bilge pump.
The hand bilge pump serves its purpose in most situations: practicing rescues, pumping out seepage after practicing rolls or, more rarely, while rafted up with another kayaker during a real rescue.
However, if you have to use it while paddling solo in rough weather, you will quickly become aware that it has two fairly serious shortcomings: You can’t seal the spray skirt, and you can’t keep both hands on the paddle while pumping.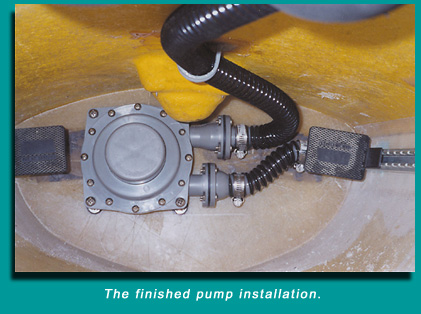
If you go out paddling alone, which many kayakers do at least occasionally, you have an obligation, both to yourself and to any others whomight come to your assistance if you get into trouble, to be as self-sufficient as possible.
The bulkhead-mounted foot-operated bilge pump resolves both of the hand bilge pump’s shortcomings: You can keep your spray skirt sealed and both hands on the paddle while pumping out your cockpit.
With basic mechanical skills, a few simple hand tools and a few hours of your time, you can install a foot-operated bilge pump for around a hundred dollars.
There are two additional options when it comes to hand bilge pumps, but in my opinion, both of these have drawbacks. For about the same cost as a foot pump, and probably with much less work, you can install a battery-powered electric bilge pump (see SK, Aug. ’99).
However, electric pumps require users to ensure that the batteries are charged before each trip and that the entire electrical system—pump, switch and batteries—is kept completely dry and free of corrosion. The second option is to install a hand-operated, through-deck pump.
While this option lets you pump out your cockpit with your spray skirt in place, you can only keep one hand on your paddle while pumping.
Solid Footing
Foot-operated bilge pumps for kayaks are all bulkhead mounted. This location provides a rigid surface and, hopefully, situates the pump within comfortable reach of your feet while you are in your normal paddling position. Wooden or composite kayaks are usually well suited for mounting a foot pump as long as the bulkhead is rigid and firmly attached.
In most instances, you can’t install a foot pump on the bulkhead of a plastic kayak. Caulked-in foam or plastic bulkheads are not rigid or secure enough to support the pressure of your foot working the pump.
A welded-in-place plastic bulkhead may be a suitable surface for mounting a foot pump, but you should check with the manufacturer first.
 Since I frequently paddle by myself, I decided to install a foot pump. After some research, I settled on the Guzzler 450-S, manufactured by The Bosworth Company. It was much less expensive and somewhat more available than other foot pump models I could find.
While not made specifically for the kayak market, it is nonetheless admirably suited for this purpose. It is non-magnetic, so it doesn’t affect compasses. Another option is the Irish-made Henderson pump— available in the U.K. as an option on VCP and Nigel Dennis kayaks.
I couldn’t find specs for it, but it’s available in the U.S. through Great River Outfitters in Michigan for about $180. I found a few references to foot pumps on web sites based in Australia and New Zealand, and some old references to a Lendal pump. I couldn’t find any other U.S.-made foot pumps.
The Guzzler 450-S has the smallest footprint of the many similar models Bosworth makes, measuring only 8 1/2″ long by 5 1/2″ wide by 4 1/2″ high (the height measurement includes 1 1/4″ for the pump button when in the extended position). This pump is rated at 1/2 liter per stroke, which works out to be between 10 and 15 gallons per minute.
I specified four options when ordering this pump. The first was direct-action—instead of a pedal or handle, a large spring-loaded button is used to work the pump.
The second option was duck-bill valves—this valve type can handle small amounts of solids. Next was 1″ end connections—a diameter smaller than one inch would reduce the pumping rate.
The fourth and final option was a lightweight return spring—less effort is required to work the pump than with the standard spring. The heavier weight spring is required when water has to be lifted several feet. That’s not a concern in a kayak, so the lighter spring is more than adequate.
1. Location, Location, Location
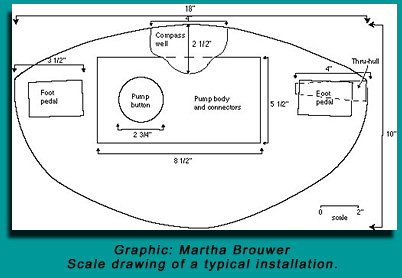
The first step of the project is to use a piece of graph paper to do a scale drawing of the installation. Draw your bulkhead, your foot pegs or rudder pedals, a compass well and anything else that might affect your choice of pump location and orientation.
Add the pump, the intake and discharge lines, the strum box (which filters debris and smoothes the flow of water into the intake line) and through-hull. Use this drawing in conjunction with actually maneuvering the pump parts inside the boat to determine which arrangement works best for your kayak. (See previous diagram.)
Ideally, your bulkhead should be about three inches forward of your foot pegs or rudder pedals.
If your bulkhead is too far away to comfortably operate a bulkhead-mounted pump, you can use either a stand-off or bracket-mounting method. The bracket-mounting method can also be used if your bulkhead is not rigid or secure enough to support the force of operating the foot pump.
Additional information on these mounting methods is given near the end of this article. Use your leg length to determine how far off the bulkhead, if at all, to mount the pump.
Determine your bulkhead height, width and distance from the foot pegs. Measure the bulkhead’s height at the centerline and its width at the gunwales. For the pegs, measure the distance from the forward face of the pegs to the bulkhead.
If you have a compass recess located in the cockpit area, it may interfere with your ability to reach and operate the foot pump. This was the case for my boat, so I mounted the pump button to the left of center. I can also use the pump as a foot brace when necessary.
If your feet are wider than the foot pegs, you should leave sufficient distance between the foot pegs and pump button to prevent your foot from accidentally hitting both at the same time.
The center of the pump button should be at roughly the same height as your foot pegs or rudder pedals. Take care to avoid installing the pump between a foot peg or rudder pedal and the bulkhead.
Doing so could pose a safety hazard by limiting rudder movement, restricting peg placement or snagging a foot during a wet exit. Note: Be very careful that the pump installation does not in any way interfere with the range of motion of your rudder pedals!
Try to position the discharge through-hull level with the gunwale, forward of the foot peg or rudder pedal, and above, below or forward of the track as space permits.
Be sure to keep enough distance between the end of the through-hull and the pump’s discharge connection to work the hose onto the through-hull. Under no circumstances should you locate the through-hull below the water line.
2. Installation
The next step is to install mounting screws on the pump, make a jig and install the cockpit-side nuts and washers. The jig is just a scrap of plywood cut to roughly the footprint of the pump with drill bit guide holes for the pump mounting screws.
You’ll use the jig for three tasks: to position the pump on the bulkhead, to drill the screw holes in the bulkhead and to position the nuts and washers on the screw shanks.
Place your screws through the screw holes on the pump body and secure each with a lock nut. While not absolutely necessary, this keeps the screw ends from moving when you’re marking their position on the jig and, later on, helps in pushing the screws through the holes you drill in the bulkhead. If your screws don’t have fully threaded shanks, then you will have to ignore this step. (Fully threaded screw shanks aren’t always easily available in lengths over 3″.)
- Cut your jig material to size: 8 1/2″ by 5 1/2″.
- Place the pump, screw ends down, on the jig so that no part of the pump hangs over the edge and the screws are all parallel.
- Trace around the end of each screw where it contacts the jig.
- Drill a 1/4″ hole for each screw and check that all screws will go into their respective holes at the same time.
- Separate the pump from the jig so that you can put the bulkhead-side nuts and washers on the screws. First, back on the lock nuts, followed, in order, by the steel and neoprene washers. Slide the jig back on the screws until it is in contact with the pump. Adjust the nuts so that the neoprene washers are secured between the jig face and steel washers.
To gain more room to work, you can remove your foot pegs (or rudder pedals) and tracks.
3. Build the Strum Box
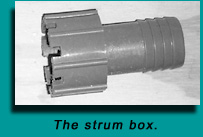 The strum box serves two purposes: It smoothes the flow of water into the intake hose and strains out any large debris. To make your strum box, use a hack saw to notch the rim of a 11/2″ end of PVC coupling. The notches should be about 1/4″ wide by 1/4″ deep and evenly spaced. (I used a table saw to cut my notches. I set the blade height to 1/4″ and set the rip fence to 3/4″. You can also use a round or a rat-tail file to make the notches.)
4. Drill and Slide
The next step is to drill screw holes in the bulkhead and slide the pump into place.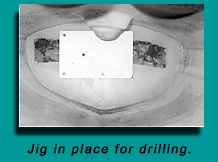
- Stick some double-sided tape on the back of your jig and position the jig in the location you decided on in step 1.
- Drill the four mounting holes through the bulkhead using the jig as a guide.
- Remove the jig from the bulkhead, and check that the pump screws slide into place in the bulkhead.
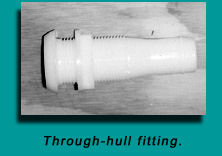
5. Install the Through-Hull Fitting
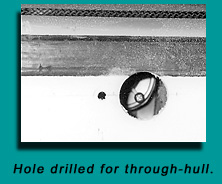 Select and mark a center point for the through-hull, and drill a 1/4″ pilot hole for your hole saw.
- Drill the 1 1/4″ hole for the fitting.
- Generously apply marine caulk to the hull side of the through-hull’s flange, then fully insert the through-hull into the hole that you drilled.
- Thread the nut on by hand, then tighten using a wrench. This step may require two people: one reaching inside the cockpit to turn the nut and the other on the outside to prevent the through-hull from turning.
- Wipe off any excess caulk after fully tightening the nut. (Figures 5 and 6.)
6. Cut and Clamp
 Cut the hose to the lengths you estimate are needed to go to your through-hull (discharge hose) and strum box (intake hose). Err on the generous side—cut them long and trim as necessary. Since you might have to route the intake hose around the inside of the cockpit to get from a strum box (located behind the seat) to the pump, there’s really no straightforward way of determining the length beforehand.)
- Remove the pump, and clamp on your hoses. It is much easier to attach the hoses to the pump when it’s outside of the cockpit.
- Slide the pump back into place.
- Check your hose lengths and trim to fit, if necessary.
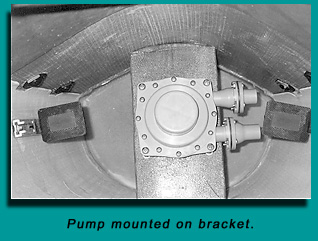
7. Bolt the Pump in Place
 You’ll need to work through the front hatch to fasten the pump to the bulkhead.
- Slide a neoprene washer followed by a stainless steel washer over each screw end before starting the lock nuts.
- Screw the lock nuts on until tight.
- Cap each screw end with an acorn nut to prevent tearing any gear you stow in your forward compartment.
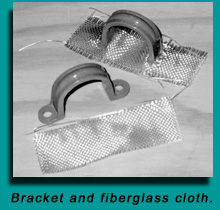
8. Epoxy the Hose Brackets in Place
If you are installing your strum box at the rear of the cockpit, or you need to bend the intake line to fix its position against the front bulkhead, now is the time to install your brackets.
The brackets are necessary to secure the hose to the inside of the hull so that there is no possibility of your feet becoming tangled in the hose and interfering with your ability to safely exit your boat.
- Cut a piece of fiberglass cloth (approximately 1″ by 3″) for each bracket. For cloth weight, I used 12 oz., which is what I had on hand; however, the weight isn’t critical here. The cloth is used to provide more surface area for the resin than is provided by the bracket feet.
- Make two slits in each piece of cloth for the bracket feet, wide enough and far enough apart that you can easily insert a bracket foot in each.
- Slide the feet into the slits.
- Use 80-grit sandpaper to roughen the inside surface of the hull where each bracket will go.
- Mix your epoxy and saturate the fiberglass cloth.
- Set the brackets in place, smooth the cloth using your fingers (wearing latex gloves, of course) and let the resin set up.
9. Finish the Installation
After the epoxy for the hose brackets has cured, run the line or lines through the brackets and clamp them to the through-hull and strum box as necessary. If you removed the foot pegs or rudder pedals and tracks, you can now reinstall them.
Stand-Off Mount Installation
For bulkheads located between three and seven or so inches past your foot pegs, use this installation method to install the pump at a comfortable operating distance:
- Measure the distance from the bulkhead to the forward face of a foot peg or rudder pedals in the neutral position.
- Subtract 1 7/8″ from this measurement, and cut your plastic pipe to this length. A 2″ Schedule 80 PVC threaded coupling has the correct outside diameter.
- Get 20 1/4″ screws long enough to leave at least 3/4″ (room for the lock nut, washers, and acorn nut) on the other side of the bulkhead. Add 2 5/8″ plus the thickness of the bulkhead to the length of the cut pipe for this measurement.
- Proceed with regular installation, following steps 2 through 9.
Bracket-Mount Installation
 For bulkheads located more than seven or so inches forward of your foot pegs or rudder pedals, you can install a partial bulkhead made of fiberglass-covered plywood on which to mount the bilge pump.
Marine plywood is your best bet, and all grades are acceptable. You can use exterior-grade plywood also, since you’ll be covering it with fiberglass and sealing the screw holes with neoprene washers. But use a CBX grade or better, and make sure to inspect the middle layer for voids. Reject any wood containing voids over 1/8″ or showing any signs of delamination.
- Cut your plywood to a length slightly longer than the height of the deck at the point of installation. (This should be approximately three inches forward of the foot pegs.)
- Use a profile gauge to trace the deck and hull curves onto the bracket ends.
- Cut the bracket about 1/4″ shorter than the deck height to allow for the thickness of cloth and epoxy.
- Cover the plywood with fiberglass cloth and epoxy to prevent water damage to the wood.
- Using the jig, drill holes for mounting the pump.
- Set the bracket in place.
- Cut four 6″ lengths of fiberglass tape, saturate with epoxy, and place over the joints where the bracket meets the deck and hull.
- After the epoxy has cured, proceed with installation, following steps 4 through 9
Testing
I pool-tested the installation and was completely satisfied with the results. I hung on the outside of the bow long enough to submerge the through-hull.
There was no leakage either into or around the through-hull. I then got in and sculled, with no spray skirt on, to flood the cockpit. I was easily able to pump the cockpit dry in just about one minute.
I was a bit disappointed to see that the stream of water exiting the through-hull was only a bit more than a foot in length, as I’d been hoping to use the pump as a super squirt gun. On the plus side though, it’s unlikely that you will accidentally spray either yourself or a companion. I was pleasantly surprised to discover that, with the pump button set off to one side, I could use the pump in place of the foot peg as a brace.
An important thing to remember is that a bulkhead-mounted foot-pump is a relatively permanent and personalized modification. Someone with legs much shorter than yours will not be able to reach the pump comfortably.
Someone with legs much longer than yours may find your pump an impediment or possibly even a safety risk. If you make the decision to install a foot-operated bilge pump, you should still continue to carry your hand pump in case you need to help another paddler or to pump out one of your bulkhead compartments.
Ready for Action
With a relatively small investment in time and money, you can simultaneously pump out your cockpit, keep both hands on your paddle and have your spray skirt in place.
With a hand pump, at best, you can only get two out of three.
Every serious paddler, and especially those who paddle solo, should consider installing a foot-operated bilge pump. In a rough-weather situation, and with no one to raft up with, a foot pump can provide just the edge you need to make the difference between a serious situation and a minor inconvenience.
And with the extra bit of confidence that knowledge should give you, it may keep you from getting into trouble in the first place.