
Don’t let winter hinder your passion for paddling
Text and photography by Nicolas Bertrand
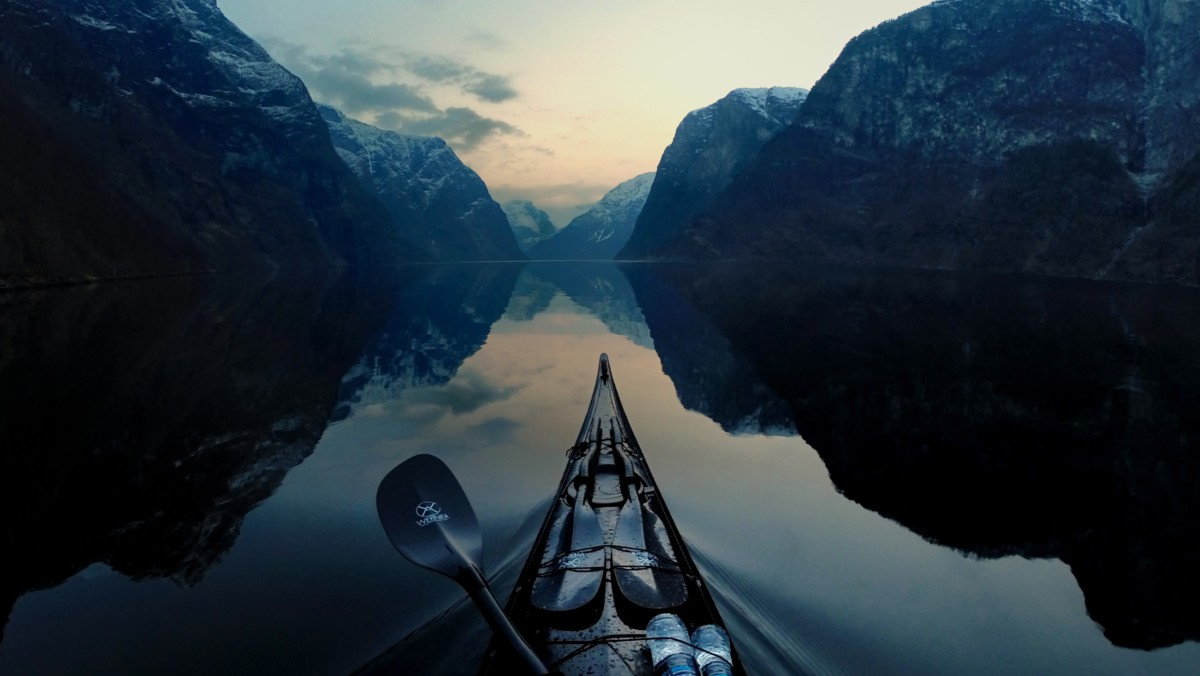
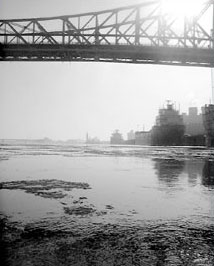
It’s a perfect winter day. With the previous night’s low of –15°C/5°F, I know there will be lots of ice in the St. Lawrence River in Montreal Harbor in the Canadian province of Quebec. The sky is clear, the air is still and the temperature will rise during the day, making the cold milder. For me, these are ideal conditions for a day of sea kayaking. 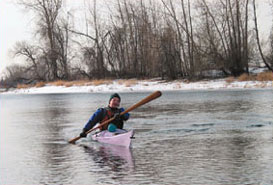
In the winter, even going for a single-day outing involves careful and methodical preparation. I don’t go out if I feel tired. For winter paddling to be safe and enjoyable, it requires being completely rested, and this morning, I am. With all the layers and gaskets I have to put on, getting dressed takes even longer than bundling up a toddler for the snow. The kettle whistles, and I fill my insulated bottle with hot water.
At Charron Island, my usual take-out (located midway down the St. Lawrence River, south-east of Montreal’s harbor), conditions are not good. A ribbon of ice chunks mixed with slush is drifting against the ice edge. The ribbon is uninterrupted—there is no place to launch from. At this distance, I am unable to tell whether I can cross the ice ribbon to reach open water. Furthermore, coming back across the ribbon might be impossible if the density of the floating ice increases during the day. I decide to continue my scouting.
I head back to the car to move a little farther upstream. There is another put-in at Longueuil. I don’t often launch from this area because the current is faster; however, today it may be my best option.
In Longueuil, I drop the kayak from the car rooftop directly to the snow and drag the kayak like a sled toward the water. Today, Montreal’s harbor is a complex world of ice; a majestic ribbon of moving colors and reflections, alive and whispering.
Before setting foot on ice, I dress for immersion in frigid water (in the range of 3°C to –2°C/37°F to 28°F). At this temperature, water is cold enough to cause pain to bare hands. I zip my dry suit, tighten my boot gaskets and put on a neoprene hood and a pair of neoprene gloves.
With the paddle in my left hand and the bow of the kayak in my right, I step onto the ice. Even after a few winters of doing this, I am always a bit nervous when first setting foot on an icy surface. Holding onto a 17-foot kayak and a 7-foot paddle and wearing proper immersion gear and a PFD makes this activity safe, but it still feels weird. Today, the ice cracks and squeaks. It is slippery, too. A few people ashore watch me slip and fall. Ouch! How can water be so hard?
As I continue my scouting, I notice a large area of water free of ice. Currents push the ice north of this area. By launching here, I will be able to get closer to the moving ice to assess its density. If it turns out to be too dense to paddle in, I can return to my point of departure. Because there is no wind, only the current affects the movement of the ice. I must pay close attention to the air surrounding me—if a breeze begins to blow, I must be aware of it and assess its influence on the movement of ice and on my planned route.
I walk 300 meters to yesterday’s ice edge. The demarcation between yesterday’s and today’s edge is sharp and clear. I can see pieces of ice pointing up in the air, frozen in place after being pushed up by the current, then clear translucent ice beyond.
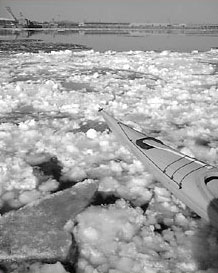
The final 30 meters consists of ice formed over the last 12 hours: a bizarre patchwork of white ice chunks called shuga (so named because of its resemblance to powdered sugar). The shuga drifted, aggregated and, surrounded by a thin, transparent layer of newly formed ice called nilas, froze in place. The nilas, approximately one or two inches thick, flexes under my bodyweight.
Walking on nilas gives me chills, especially when it’s brand new and still elastic, like today. Bending down, I drag the kayak by the coaming, ready to lie down on the kayak should the ice give way. When possible, I hop from one chunk of shuga to the next, avoiding the nilas as much as possible. I see little bubbles moving underneath the ice. Water finally! With the kayak resting on a piece of shuga, I get in, secure the spray skirt and push myself into the water.
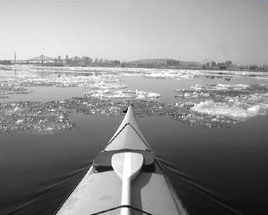
From where I sit, it looks unlikely that I’ll be able to paddle at all today. There are traces of water in my immediate surroundings, but in the distance, there seems to be only ice. It looks like I would need snowshoes to get anywhere.
As I proceed, however, one channel opens up to another, and lines of frazil (small plates of ice just under the surface of the water) are easy to cross. Frazil gives the water a slick, oily feel. When it hardens, it turns into slush or semi-solid snow. Slush can be paddled, but doing so can become very tedious. Today it isn’t. The ice that looked too dense actually has enough water to be paddled.
Little ponds among the ice fields grow and shrink here and there. In spite of the –5°C/23°F air temperature, the warm sun and still air make for comfortable paddling conditions. I decide to go toward the Old Port of Montreal, where I might grab a hot drink. I hope that the floating ice I see will continue to look more packed than it really is.
 After some hit-and-miss route-finding through the ice, a few chunks of which hit the kayak, I reach the Old Port. A couple of ducks sit on the thin ice of the still-water basin. At first, the ice is like paper, then it thickens very progressively. I break over five kayak lengths of it until I find ice too strong to be broken by the paddle, but not strong enough to support the kayak’s weight. Unable to dig my paddle in, I can’t exert enough force to advance. Because the kayak itself is not supported by the ice, I can’t stand or even crawl on it. It looks like my planned stop won’t be possible today. This is yet another reminder that, in the winter, you don’t always get to do what you’d like, so you can only take advantage of what the conditions allow. Flexibility is a must.
In the summer, navigating your way out of the Old Port is hellish because the area is overrun with powerboats and jet skis. High speeds, drunk drivers and powerful currents make the area unpleasant, if not outright hostile, to sea kayakers.
But today, thanks to the cold, there is absolutely no one in sight. The river is all mine. On my way back, I drift down along the frazil. It is like being on a magic carpet ride. Sitting in frazil, the kayak is surprisingly stable. I change gloves and drink a little warm water. I realize that I need to start making my way back. The sun is getting lower and I will eventually become tired if I stay out too long. It is wiser and safer to stop before fatigue sets in.
Practical Aspects
This article addresses the specifics of paddling in below-freezing temperatures with ice and frigid water, but it does not cover the basics of safe sea kayaking in cold water. Knowledge about self-rescue and proper clothing for immersion in cold water is a prerequisite.
Extending your paddling season to include the winter months should be done only after you have developed strong safety skills during the regular season. Be aware that rescue potential is different for winter conditions than for summer.
The Coast Guard probably expects outdoor enthusiasts to be on skis rather than in kayaks at this time of the year. Their ability to travel by boat will either be significantly reduced or made impossible by ice, so assume that you are on your own. Last winter, two ice fishermen near Montreal had gone on an unplanned “cruise” when the ice they were fishing on broke loose from shore. A helicopter had to fly in from Ontario to rescue them.
Assistance can take several hours if it’s available at all.
Being Dry
For winter paddling, the usual cold-outdoor-activity wisdom applies: Avoid sweating, and stay dry. This is especially difficult to achieve when enveloped in a dry suit, Gore-Tex or not. Gore-Tex breathes, but may not be able to allow body condensation to evaporate entirely during even moderate exertion. Being wet in winter is perilous.
Even winter-sports amateurs are generally aware of the importance of staying dry in subfreezing temperatures. When your winter sport is sea kayaking, the challenge of being dry is even greater. A good dry suit, waterproof gloves and neoprene boots make it possible to stay close to a state of dryness.
Using a wetsuit, river shoes and pogies is a mistake in subfreezing conditions: They won’t keep you warm enough while you’re paddling and will be dangerously ineffective if you wind up in the water. Aside from the danger of paddling with improper equipment, you’ll be so cold, it won’t be any fun.
I regularly go out for five- to eight-hour intervals in temperatures as low as –15°C/5°F, and even if there is a breeze adding a wind-chill factor, I’m comfortable most of the time. I can’t stress enough how important a dry suit and waterproof gloves are to safe winter paddling.
 For my outings, I start by layering synthetic fleece. The amount of fleece I put on depends on temperature and wind speed. For conditions below –5°C/23°F, I start with a base of four layers. The first layer is moisture-wicking fleece long underwear, which covers my legs, torso, arms and the bottom of my neck, in the area just below the dry-suit gasket.
The second layer is an expedition-weight fleece top. The third layer is a farmer john fleece garment, covering my legs and torso but not my shoulders and arms. This one-piece farmer john is especially useful for covering my back and waist comfortably, preventing cold gaps in clothing. The fourth and final base layer is a big, heavy, thick fleece top.
Over all four layers, I put on my dry suit. The last step in putting on the dry suit is to expel air from it. With an inch of the zipper left to close, I crouch, round my back and try to squeeze out as much air as I can, then close the zipper. Standing up, I can feel the outside air pressure pushing the fabric against my skin.
The spray skirt and PFD form a final layer. My legs have a little less fleece coverage than my upper body, but the closed kayak provides a means of protection from the cold.
The golden rule for staying dry is to adjust the intensity level of the activity to the current heat needed by the body. If you’re feeling cold, paddle a little more vigorously until you warm up a bit.
Don’t overdo it and reach the point of sweating. If you are too warm, slow down. The goal is to be as dry as possible. I recently switched to a Greenland paddle and found that it lets me more finely tune my paddling pace, especially in light cadences, allowing better temperature control. When it is below freezing, you’ll feel drier than you will at near or above freezing.
The condensation that builds up inside a dry suit will ice up the inside of the fabric. At a break, simply turn your dry suit inside out, reversing it down to the knee, and brush off the icy buildup.
Extremities
If your hands, feet and head are cold, your core is probably not warm enough. Warm waterproof gloves are a must. I find that fleece-lined neoprene gloves work best.
Make sure the seams are glued and watertight. Good neoprene gloves are expensive and can also wear quickly, but they are reparable. I take two pairs on each outing and alternate them throughout the day as one pair gets damp, usually every two to four hours.
At home, I test for leaks regularly and repair them as needed with Aquaseal neoprene sealant. 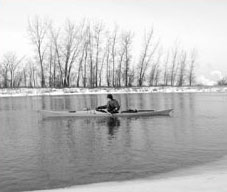
Even with perfect gloves, your hands will eventually become humid, either from water infiltrating the wrist areaor from perspiration. Your hands are very vulnerable to low temperatures.
Cold and humidity can affect tendons and finger articulations, making them stiff and painful for several hours after paddling. According to professional divers working on the maintenance of a low-temperature aquarium in Montreal, frequent and repeated exposure of the hands to cold water can lead to arthritis.
Do not wear damp gloves for too long. Your hands will thank you for frequent glove changes.
Another good practice to adopt is to wiggle your fingers while paddling, which will keep them loose and keep your blood circulating. Use very light pressure when pushing the paddle shaft so you can wiggle your fingers at the same time. The increased blood circulation in your hands will keep them warm.
Neoprene boots and wool socks keep feet warm and dry. I use neoprene mukluks and find them to be very warm. Allowing wiggle space for your toes is very important.
A common mistake is to wear boots that are too tight, which hinders blood circulation and causes cold feet even if your core temperature is ideal. The same is true with too-tight gloves.
A skull cap will keep your head warm. Properly adjusted, it will even prevent water from entering your ears during immersion. I use a neoprene shell lined with Lycra fleece that fits snugly around my face.
Finally, a scarf or facemask is nice if the wind is blowing. The mountaineering-style neoprene facemask covers from the nose down and secures around the neck, protecting it as well. Under some conditions, small splashes and wind can cause blisters on your face quicker than you can say “freeze!” A good facemask will let you fully enjoy the beauty of a snowstorm from an unusual setting. Are we warm enough now?
Before Ice
Maybe the biggest mistake you can make in sea kayaking is overconfidence. Don’t assume that just because you can reliably roll or do a recovery in cold water on a fall day that you will be able to do the same among chunks of ice in February. Gradual preparation and practice are essential.
How will your body react to frigid water? Is your equipment up to the task? Failures that might be annoying in warmer conditions are likely to become catastrophic in the winter. There is only one way to find out if you are ready: Go for a swim.
Observe the local conditions regularly for the area you want to paddle over the course of fall and early winter. When a little ice begins to form in the area, paddle out on the water (appropriately dressed, of course), exit the kayak and swim.
This exercise should be done near shore, in chest-deep water with a partner nearby. Take a look around to see if anyone might see you capsize. It is wise to warn passersby about your drill. They might think that the situation requires an emergency call and take action. 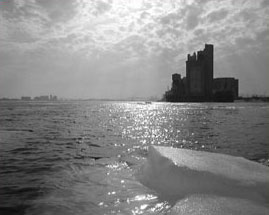
Once in the water, observe the effect of the cold on your body, but come ashore before you get hypothermic. Be aware that poor judgment is one of the early symptoms of hypothermia. Other deceptive symptoms include apathy, confusion, inability to solve problems, unawareness of a dangerous situation and making no effort to protect yourself. Your partner should be reliable, dressed for immersion and able to drag you out of the water. In all cases, be very cautious and try to recognize the early symptoms of hypothermia, and have your partner closely involved in keeping you safe.
When you are done swimming, remove your gloves and immerse your bare hands in the water. If the water is frigid, it should convince you to keep your gloves on at all times.
Frigid water can render your hands useless in less than 30 seconds. Furthermore, taking bare hands out of the water into subfreezing air temperatures is also very painful. It’s essential to wear gloves at all times when walking on ice or when paddling where the water is cold, especially when ice is present.
At near-freezing water temperatures, even with a dry suit, you can actually feel your body heat quickly draining out. It can’t be stressed enough how deadly frigid water is. Experience it in a controlled manner before committing yourself to the challenge of winter paddling.
Practice swimming and reentry in cold water close to a beach, even if your roll is bombproof. At some point, you will fall in the water while walking on ice. If you paddle in icy conditions, assume you will regularly wind up in the water, whether you want to or not. This is especially true in late winter or under conditions where breaking through the ice will be either more frequent or certain.
A Little Extra Advice
Your kayak must stay afloat no matter what happens. Use float bags in the forward and aft compartments and place all your cargo in dry bags. Should a watertight hatch fail, the float bags will ensure proper flotation of the kayak.
Taking extra warm clothes and food is a good idea. In dry bags, carry a complete change of dry fleece, a winter coat, dry mitts, a hat, extra gloves, boots and a warm sleeping bag if you are in an area that is even a little remote. Besides adding flotation, these items can be very useful in case of an emergency situation.
Equipment
One extra piece of equipment specific to winter paddling is a set of ice claws, or any other object sharp enough to bite the ice, enabling you to get a grip in it. On my first outing on ice, I was paranoid enough to take along an ice axe.
Although an impressive prop to display on the deck of your kayak, the ice axe is bulky, rusts easily and sinks quickly. A paddler’s knife, either a sheath knife or a folder with a locking blade, can be a useful tool to get a grip in the ice, but make sure the tip is not filed off, as is sometimes the case.
A blunt tip will make it more difficult to get a secure grip in the ice. The fact that knives do not float also reduces their utility. In this sense, ice claws are a better choice. They are easy-to-make, effective tools used to drag yourself out of the water over slippery ice. 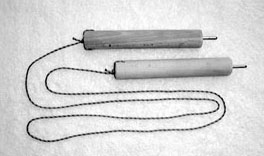
To make your own, cut a 1-foot long, 1 1/4-inch thick dowel in half. Drive a 2-inch-long screw about an inch into the center of the end of each stick (or farther if using a longer screw).
Use a hacksaw to cut off the head of each screw and file the tip to a point sharp enough to dig into ice. (The important thing is that the screw is firmly embedded in the dowel and will resist pulling. It shouldn’t move at all or break away from the dowel under some force.
If you try to pull yourself over a lawn with it, you should damage the lawn, not loosen the screw. Force exerted on the dowel will be less on ice, where there is less friction than on a lawn.) On the other end, drill a hole through the dowel approximately an inch from the end, and thread a 4-foot piece of small rope through the hole to tie the claws together. Carry them in a convenient, accessible location. Ice claws cost almost nothing to make and can be truly useful.
Portable Heat
A warm water bottle is another excellent way to stay in the comfort zone. It is a surprisingly effective, portable heating device. Use a Thermos or MSR bottle parka that you can carry under a deck bungee cord. You can also wrap a hot water bottle in several layers of fleece and carry it inside the kayak.
Fleece is an excellent insulator. Feeling cold? Sip a little hot water. Be careful not to overuse it, however. If you become hot and sweaty, your clothes will dampen, and shortly thereafter, you will be cold and miserable unless you stop to dry out in the wind and change your damp clothes.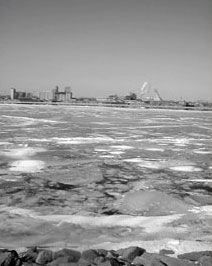
Even if you don’t feel damp, it’s always nice to stop for a dry out. I try to do it every four hours or so. At these times, the warm water bottle plays an essential role. When you remove the dry suit and roll it down to expose the fleece to the wind to dry it out, your body experiences a tremendous heat loss. Typically, I try to stand in the windiest place possible with my arms raised, turning to expose my back, torso and legs.
This makes even the most hardened northerners shiver unless they drink warm liquid!
De-icing
In subfreezing temperatures, ice will eventually form on the kayak and paddle shaft. This glaze is pretty at first, but can build up and become heavy. Use something hard to break it, such as the ice claw handles, which are very effective.
Gently tap the kayak and paddle shaft with the ice claw handle to break the ice. Dipping the paddle shaft in water will make breaking the ice easier. Cold as it is, water is still warmer than ice. It will weaken the ice, especially the bond between the paddle shaft and ice. As the owner of a plastic kayak, I can bend my boat in soft spots to help break the ice buildup.
The type of plastic used in my kayak remains flexible without breaking well below freezing. A flexible skin-on-frame kayak is very easy to de-ice. Of course, using a rudder or skeg is impossible under freezing conditions, as they become jammed with ice. My advice is to retract or remove them.
Scouting for Open Water
 As with any kayak trip, a day of winter paddling starts at the water’s edge. In summer, getting to the water is usually straightforward: drive to the water, park, unload and launch. In winter, it’s not always as simple. A weak ice edge, where ice meets water, can complicate entering the water or make it impossible. Drifting ice, at the mercy of wind and current, can alter course during the day, and rapidly evolving ice conditions can hinder landing. Thus, scouting is essential to get to open water and to note places to take out if the ice shifts.
Finding an acceptable put-in is part of the joy of winter kayaking, particularly if it involves a bit of a hunt. Changing conditions are also a large part of the fun: In winter, no two days of paddling are ever the same.
When winter conditions are warmer, such as early and late in the season, searching for places with the most floating ice is often a good reason to drive around. When ice is scarcer, I tend to paddle in the areas where it is more concentrated, usually channels with less current.
Snow coverage may mean I have to park in places more distant from the river, but it is easy to pull a kayak across the snow—even a one- or two-mile walk is manageable if the snow is compact or if I use snowshoes.
My waterproof kayaking footwear is warm and sturdy enough to allow for walks of this distance. Not Ice, Not Water
Probably the worst thing a kayaker can encounter while winter paddling is the combination of ice and water that’s too firm to paddle through, but not solid enough to walk on.
Conditions can change every day, every hour. Most of the time, it’s no problem to put in and get out. I’ll walk to a solid ice edge, sit, secure my spray skirt and push myself in. To make a landing on the ice, I’ll paddle fast, aiming the kayak directly at the ice edge.
If I have enough momentum, the kayak can even slide far enough to get me over solid ice.Sometimes it’s possible to get around some fairly strange mixtures of ice by crawling, jumping and swimming. These types of endeavors can actually be fun—sometimes more enjoyable than paddling itself.
Jumping from one piece of ice to the other, discovering which ones are large enough to support you and which ones are not, even feeling the ice move under your foot and sink slowly is very enjoyable. Crawling in slush is also enjoyable. These are experiences I like very much. It is always so new, I feel like a child discovering the world.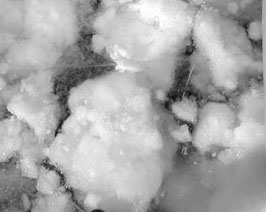
Finally, beware of current going under the ice edge. On May 16, 1999, two river kayakers on the Copper River, in the Wrangell–St. Elias National Park, Alaska, were dragged under the edge by the current.
Fortunately, they lived to tell their tale, which involved being under an ice edge for a full minute. Under the right circumstances, even a weak current can be strong enough to drag someone under the edge.
Cheated by Time
Somehow, time moves faster when I paddle in the winter than in the summer. Maybe this is an indication that paddling is more fun in the winter! Maybe it is the solitude or the wonderful spectacle of ice, its colors and sounds.
Whatever the reason, I get the most thrill and satisfaction out of sea kayaking in the winter. With adequate preparation, the right equipment and the proper skills, you might also discover that the snowy months of the year are the best for paddling.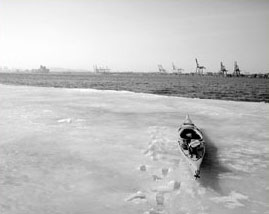
Winter paddling can be contemplative, even a little magic. Dazzling as it is, however, this is a hostile environment. There is no such thing as safe ice.
Thin or not, it can always be treacherous. Each winter in Quebec, there are casualties when people break through ice. The formation and transformation of ice is a constant evolution, every moment a wonder. But equipment and procedure are essential to paddling safely in the winter.
The beauty of the setting must not take precedence over pragmatism and awareness of danger.
I’ll leave you with my main piece of advice on paddling in the winter: Don’t do it unless you are totally confident about it. It’s better to be prepared and safe so that you have plenty of winter paddling experiences ahead of you.
Nicolas Bertrand is a schoolteacher from Montreal, Quebec, Canada. He has paddled most of the Gulf of St. Lawrence’s north coast, and he started winter kayaking in 1999.
Resources
Ice Conditions
Canadian Ice Service (http://ice-glaces.ec.gc.ca/)
The Canadian Ice Service is a complete source of information on ice in Canada. Although not designed specifically for sea kayakers, it is an essential reference for current conditions.
National Ice Center (www.natice.noaa.gov)
The National Ice Center provides current conditions for the United States.
Additional Information
The Minnesota Department of Natural Resources website has some helpful information on ice safety and the fabrication of ice claws
Wrangell-St. Elias Park & Preserve
“An Account of a Kayak Trip Gone Wrong,” National Park Service, May 16, 1999 (www.nps.gov/wrst/kayaksafety.htm)