
“The scramble is pretty much useless outside of a swimming pool,” an instructor we’ll call Andy (names are changed here to respect privacy) stated flatly to the group of seven other instructors who stood on the beach, dripping in drysuits after our rescue practice session.
Beyond the protection of our little cove, the open Pacific slam-danced in the afternoon wind—20 knots from the northwest—a confusion of steep, five-foot wind waves constantly bouncing off the cliffs and back into the fray. To my surprise, one of the other instructors, Mark, nodded in agreement with Andy, while the other four just looked confused.
“What are you talking about?” one of the four, Bryan, asked. I just smiled and kept my mouth shut for a change, realizing that this was one battle I wasn’t going to have to fight. We had just finished rough-water recovery practice as part of a Level 5 American Canoe Association instructor training course, a context that turns out to be relevant, as will become clear shortly.
In the confusion of whitecaps and waves, a variety of self- and assisted recoveries had been tried, and it was impossible to keep track of who had done what. As one of the instructor trainers facilitating the course, I stepped in and asked only for a show of hands for who had completed a scramble.
Four hands shot up. The only hands that didn’t, I noted, were Andy’s and Mark’s. Now it was their turn to look surprised.
This pooh-poohing of the cowboy scramble as a viable rough-water recovery for sea kayakers seems to be a fairly common refrain among many skilled paddlers. In another recent class a group of intermediate kayakers looking to improve their rough-water recovery skills looked surprised that we’d be “wasting time,” as one put it, working on scrambles.
He even showed me the page in a popular instructional manual where the scramble is dismissed as useless in rough seas. I told my students that the practice would be “good for improving your balance, even if it doesn’t end up working out for you in rough water,” and they all agreed to try.
As we landed after class, I ran into a paddling acquaintance who’d just finished his weekly trip along a stretch of exposed cliffs. After asking what kind of class I’d been teaching, he quipped, “Of course those are all basically ‘placebo rescues.’
I mean, they’re like, pretty useless in the kind of stuff you and I like to paddle in. Unless you happen to dump in flat water and miss your roll for some reason, everything except a reenter and roll is basically a pool trick.”
I merely shrugged and said, “We were just out there practicing cowboy scrambles, but it really wasn’t all that rough; only a few whitecaps.” Actually it had been blowing a steady 15 knots for several hours, so it was whitecapping continuously with one to three feet of steep chop, conditions that would be moderate to fairly challenging depending on your skill set.
“Really?” he said, a bit surprised.
“Yeah, after a little practice in the harbor this morning,” I added, “pretty much everyone in class was able to pull off at least one cowboy out there.” While I’d be the first to agree that it really wasn’t all that rough, it certainly weren’t no swimming pool neither.
Theory of Pooh and the Secret to a Successful Scramble
My theory about why many skilled paddlers don’t consider the cowboy scramble a viable rough-water technique is based on several observations. First, I’ve noticed that those dismissing the scramble generally have learned how to roll and/or how to reenter and roll.
Second, pretty much none of them have yet learned how to scramble in anything but flat water, if that. Those who’ve spent maybe 20 minutes, at most, trying the scramble in rough water conclude too quickly that the scramble is ineffective.
No one expects to learn how to roll effectively after 20 minutes of practice. But I’ve seen that most of those who dedicate as much time in the scramble as they do in rolling will find it useful and effective in rough water. It just takes practice.
Most students get the hang of it in much less time than it took them to learn to roll. And many paddlers who haven’t had much luck learning to roll find the scramble an easier, albeit less efficient, means of capsize recovery.
Tips for Cowboys and Girls: Keys to an effective learning progression
A few tips and techniques can make a difference. Practice each step separately in the shallows first, much the same way you’d practice the pieces of a roll, working on hip snaps, sculling and other exercises in the swimming pool before trying to put the whole complex skill together.
After you’re comfortable with the pieces, practice the whole thing starting in about two feet of water in a calm area, so you can cheat if you need to, before gradually moving into deeper water.
It is important to spend some time hanging out on your back deck. Once you’ve spent 10 to 20 minutes to as much as an hour getting comfortable balancing, bracing and paddling on the back deck, you’ll probably have more luck putting the whole technique together (see sidebar: 4 HOURS TO SCRAMBLE SUCCESS, page 45).
Step-by-Step Scramble
Bow Lift Drain I like to start by getting most of the water out of the cockpit so I don’t have to pump as much out once I get back aboard. The bow lift is a nifty trick but it can be challenging to master.
You can skip this part until you are comfortable with the rest of the rescue. The basic idea is to lift your bow to drain some or all of the water from the cockpit before reentry.
Simply grab the bow of your capsized kayak and reach for the sky. OK, so this is harder than it sounds. A lot of people just end up getting their heads pushed under water. It sometimes helps to twist the kayak sideways first to break the seal at the cockpit, then immediately lift the bow with one hand (I use my stronger, right arm) while sculling with the other hand and simultaneously doing the eggbeater kick (described below).
In one quick motion, punch the bow skyward, and as your kayak reaches its apex, spin it so it lands upright. Rough seas actually help this, if you can time the waves right. To keep from losing my paddle, I corral/put it on my right shoulder when I lift to keep it between my arm and my ear. Some paddlers like to put the shaft on their opposite shoulder and pull down on the blade face with the free hand to create some lift.
Mounting the Horse: Plan A
For many, the hardest part of the scramble is lunging onto the aft deck without pulling their kayak on top of them. Rather than trying to pull your body up onto the boat, try to push the boat down and pull it under your body.
It’s a subtle but important difference. With your paddle held perpendicular across the back of the cockpit with one hand, grip both the paddle and the coaming behind the seat; the other hand will be about shoulder-width away on the back deck.
Kick your feet to the surface to get your body nearly horizontal and then quickly lunge across the deck, pushing down on your back deck and pulling it underneath you while still kicking. Some have better luck if they bob their kayak up and down a couple times first to get a rhythm going before the final lunge.
The idea is to try to land with your belly across the back deck. If you only get your chest on deck, you’ll probably end up pulling the boat over on top of you.
Mounting the Horse: Plan B
If you have trouble getting on the deck just aft of your cockpit, try farther back where the kayak is narrower and lower, or even climbing in directly over the stern. A rudder won’t help, but with a little practice you’ll likely figure out how to negotiate it without losing your ability to procreate.
Some people hold their spray skirt grab loop in their teeth to keep it from getting in the way or getting tangled in the rudder. The farther back you go, the easier it tends to be to climb on deck, but the more you’ll have to scramble to reach the cockpit, so once you develop your Plan B routine, work your way forward until you can lunge aboard by the cockpit.
Balancing on your Belly Button
Once on the back deck, you want to move smoothly, avoiding jerky motions, and keep your weight—centered on your belly button—on the midline of the boat.
This may feel off balance, but if you start to fall face-first over the far side, you can arch your back for balance. Spin your legs slowly around behind you, kicking your feet gently on the water for balance, until you can straddle the back deck.
Keep Your Feet in the Stirrups
As the name Cowboy/girl suggests, you want to straddle your kayak as you would a horse. It’s important to keep your feet down deep in the water, more or less where the stirrups of a saddle would be. One common mistake that’ll screw up a scramble faster than rotten eggs is holding your feet straight out behind you, like a surfer lying on a surfboard.
Use an Eggbeater
Your feet are your main stabilizers, so in addition to keeping them down, keep them gently kicking and sculling for balance. Water polo goalies use a circular sculling motion called an “eggbeater” kick, and with practice can lift their bodies out of the water nearly to the waist. A less aggressive eggbeater is all you need to keep your scrambles sunny-side up.
Use Your Paddle to Brace
The best place for your paddle is in your hands, across your deck, facedown, ready to brace. Some books and videos show the paddle in the cockpit or under the front deck bungees. While a paddle in the hand might not offer much support, it is better than nothing. Unfeathered blades will have a slight advantage.
Inchworm Crawl
With feet down beating eggs and paddle in hands, lean forward onto your forearms. Like an inchworm, slide your elbows forward and scootch your bottom forward to follow. Repeat as necessary until your butt is clear of the seat-back.
Drop and Brace
Set yourself up with your paddle blade facedown, ready for a high brace on your strong side. Moving slowly here will create wobble, which is difficult to control, so drop your butt into the seat in one smooth, quick motion, while simultaneously slapping a high brace with your paddle for balance.
This is the crux move, especially in rough conditions. As you drop into your seat, turn your high brace into a sculling brace for continued support. If you have good balance you won’t need the support of the paddle in calm water, but practice bracing anyway; it is essential for success in rougher seas.
Feet In…or Not
Once your rear is down in the seat, you’ll be much more stable. Use a sculling brace on one side for support while you work your opposite leg into the cockpit and find your foot brace.
Lying back on the deck and sculling on the opposite side leaves more room to lift your knee. To create even more room and additional support, use an extended paddle position on your brace, holding the end of the blade with your inside hand.
If you are in a tide rip, surf zone or rock garden with calmer water and/or paddling partners nearby, one option is to paddle with your feet dangling out until you reach more favorable conditions.
This may also be the required option for those with cockpits too small to get their legs in without sitting up on the back deck first, an extremely unstable position in rough water.
I will be the first to admit that the cowboy scramble has its limitations, as do all recovery techniques, especially for certain kayaks—those with small cockpits, for example—and certain body types. Stocky men tend to have more trouble with balance. Big and/or tall types in general typically require up to twice the practice time as smaller, more agile students, and, like with the roll, a few students may never get there.
But I’m 6’3″ and recently taught a student who was 6’6″ some tricks that allowed him to be successful after only an hour or two of practice.
Paddlers who lack the flexibility, agility and/or upper-body strength to access their back decks during a paddle-float recovery without using a sling, will first need to develop those abilities before attempting to scramble. But I’ve found that the main thing most students lack in being successful is a little bit of coaching and a few hours of practice.
Epilogue
By the end of the instructor course, neither Andy nor Mark passed his Level 5 instructor exam that weekend. Although talented teachers and strong rough-water paddlers with fairly reliable rolls, both are stocky, middle-aged men with limited flexibility.
However, after a couple months of practicing in the pool and at sea, both were eventually able to master the scramble in “rough water.” While both still prefer a reenter and roll as their first choice of reentry after missing a roll, because of their body type, they both agree that the amount of water that enters the kayak is one of the disadvantages of that technique.
They may be back in their boat faster, but it is a boat full of water, whereas those able to learn the quick “bow lift” method to drain their kayaks prior to a scramble, can be back in their kayaks, skirt on, ready to paddle without needing to pump in about 30 seconds (see link to “30-Second Scramble” video below).
Even without the bow lift, the fact that a scramble generally requires a lot less pumping afterward can make it almost as fast as a reenter and roll if you consider the time it takes to get the water out. It also begs the question: If you missed your roll in the first place, why is it suddenly going to work now?
And if you’re going to take the time to do a paddle-float reenter and roll, then any time advantage is long gone. The Scramble may not be the best first choice for some paddlers, but over the years I’ve been able to teach hundreds of intermediate and advanced students to scramble quickly in moderate to rough seas. And having both techniques in your reentry arsenal gives you more options than either one alone.
See a video of the author using this technique under the Golden Gate Bridge.
Roger Schumann is the author of Sea Kayak Rescue and Sea Kayaking Guide to Central and Northern California. An ACA Instructor Trainer, he leads classes and tours in Baja and teaches courses in marine natural history at Prescott College.
4 Hours to Scramble Success
Current sports learning research suggests that it is often better to practice new skills in small bits than to struggle through in big chunks. Doing two or three sets of ten to twenty minutes of practice, in other words, interspersed with some regular paddling, would probably be more beneficial than practicing for an hour straight.
Expect to struggle at times (it is what we teachers call “learning”), but stop if you start to get too frustrated. It is supposed to be fun. Also, turning the corners of your mouth up equally on each side helps your balance! The scramble might not work for you, but don’t write it off as a mere “pool trick” until you’ve put in a few hours of practice. At the very least, you improve your balance and bracing. And you might surprise yourself with how well you can get it to work in rough water.
20 minutes to one hour of Back-Deck Balancing Practice
Start by getting comfortable balancing on your back deck, so that when you get there in the context of a scramble, it won’t feel so foreign. Start in a foot or two of water. You want the water to be deep enough for you to float with your feet off the bottom, but shallow enough so you can stand up if you start to lose your balance.
Straddle your back deck immediately behind your cockpit, sit down and lift your feet off the bottom. Spend one to five minutes practicing a combination of high braces, low braces and sculling braces. It is assumed here that you are already somewhat comfortable with basic bracing techniques.
Next, try paddling gently forward using a “braced” forward stroke, with the blade slapping the water at about a 45-degree angle for support. It is okay to wobble and fine to fall, especially at first.
But stick with it for five minutes or so, and you will notice a marked improvement in balance and comfort. Be sure that you don’t rely on balance alone: Use this braced-stroke technique even if your balance is good and you don’t really need to use it. The idea is for the technique to become reflexive, so your brace will work in rough water.
Forward-backward
Once you are able to paddle 20 to 30 strokes forward with feet lifted but without falling off your back deck, try going backward, again using a braced-stroke technique, this time slapping the back of your blade for support. Get to where you feel comfortable paddling 10 strokes forward and 10 strokes backward, then 20 each. Now you’re ready for spins.
Braced Spin Turns
Alternating a combination of braced forward and reverse sweep strokes, spin your kayak 180 degrees, paddle forward 10 strokes and spin back in the other direction. Practice using your eggbeater kick to help spin. Once you can link four of these spins in a row, you are ready for the next step.
The Next Step: Raising your feet
To really get comfortable balancing on the back deck, practice lifting your toes out of the water in front of you, with your legs straight. You’ll notice a sudden decrease in balance. You can always drop your feet back down into the water when you need to.
Now repeat all of the above exercises until you can do them with your toes in the air. The idea is to force yourself to use your braced-stroke technique (which will also make you feel more comfortable in rough water, in general) instead of just your balance.
Scramble Launch: 30 minutes to 1 hour
Practice launching and landing using the scramble method. To figure out how to get your feet in and out of the cockpit, straddle your cockpit with your boat on shore and sit down in the seat with your feet still on the ground, then fold your legs into the cockpit, one leg in at a time while using your paddle as a brace. (If your cockpit is too small, see below.)
Next, put your kayak in a foot or so of water, where it won’t touch bottom, and straddle the cockpit over the seat. Get your paddle in high-brace position, power-face down. Sit down all the way into the seat while simultaneously slapping a high brace on your strong side.
Again, practice this even if your balance is good enough that you don’t need it, in order to build reflexive bracing skills for rough water. Turn your high brace into a sculling brace while you work your feet into the cockpit. Using an extended paddle position—holding the end of the blade—can add a very powerful tool to your arsenal.
To get out of the cockpit, reverse the steps. Scull on one side while you work your feet out of the cockpit, straddle your cockpit and then stand up in the shallows. Launch and land this way whenever you can for the next month or two until it becomes second nature.
You’ll find that it not only builds your scramble recovery skills, but it is a quicker, easier way to get in and out of your kayak once you get used to it. Having the kayak afloat as you get in and out of it will also reduce the wear and tear caused by launching and landing while aground.
Tricks for small cockpits and long or inflexible legs
If your legs are too long to get into your cockpit, here are a few tricks that might help. I’m 6’3″ and to get my knees to clear the coaming, I need to raise my butt up off the seat a couple inches and lie back on the deck in most standard-sized cockpits.
Practice this first on dry land to work out the bugs before moving to the shallows. Some students find that they also need to reach down with one hand to guide their foot into the cockpit; the trick here is to practice doing a sculling brace with one hand (see photo page 43) while grabbing the ankle with the other. Awkward for most people at first, one-handed sculling is not as hard as it looks.
Put the shaft of your off-side blade on your shoulder behind your head and use your neck as a fulcrum. Add an extra 10-20 minutes of practice time for this. If you just can’t get your feet in your cockpit, practice paddling around with your feet dangling on either side.
You might not be able to complete a full scramble, but you might be able to scramble far enough to quickly paddle out of a dicey situation.
How to Unscramble: 1-2 Hours
An “unscramble” is basically a scramble in reverse, and it’s great practice for dialing in your scramble. In shallow water, practice sculling while you take your feet out of your kayak like you would for a scramble landing. With your feet in the water, put your paddle across your lap, put your hands behind you on the coaming, and push yourself out of the seat onto the back deck.
Quickly grab your paddle and start bracing, ideally before you fall in. The first time you practice this, have someone hold your bow to give you a little extra support while you work out the balance points. This might take 10 or 20 repetitions, so don’t expect instant success.
If you’ve spent some time with the back deck balance drills listed above, you should feel pretty comfortable on your back deck by now.
Continue unscrambling. Lean forward onto your elbows, and inch backward onto the back deck. Now lie down, center your belly button and spin your legs off to one side of your kayak, without losing your balance or touching bottom (but it is there if you need it).
Then spin back to the straddle position on your back deck, sit up and take a few strokes with your paddle, then lie belly-down again and spin both legs out to one side. Repeat this motion a few times until you can do it three times in a row without support or touching bottom. Then scramble all the way back until you drop your butt into the cockpit, but not your feet, and unscramble all the way back to the legs-to-the-side position.
The next steps are to take this scramble/unscramble into waist-deep water until you can do the entire sequence three times without falling or touching bottom. Then take it into deep water. From your perch on the back deck, paddle around and do some spins.
It is a great way to stretch your legs between landings on long passages. Continue to unscramble until you are in the water next to your kayak, then scramble back in. When you can do this in calm water, you are ready for some virtual rough water. Back in waist-deep water, have a friend bounce your bow up and down gently while you repeat the scramble-unscramble sequence a few times.
You’re looking for a little challenge but not so much bounce that you fall in. As you figure out how to compensate for the bouncing, your partner can start to bounce harder. After this you can try it in some choppy seas with a partner at your bow to help stabilize you at first, eventually weaning off of any support and moving into increasingly rougher seas.
Most paddlers get tired after two or three repetitions and performance starts to nose-dive. Take a rest if this starts to happen and try again later or another day. Flailing continually in rough water doesn’t really teach you anything except frustration, so back off to a level of challenge where you are successful. –R.S.
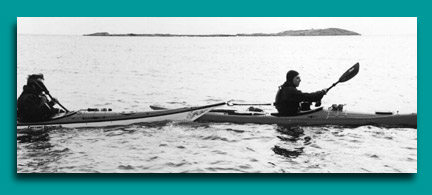
 The paddle bridge requires the kayaks to be nearly parallel and just far enough apart to rotate the victim up between the kayaks.
 It’s also better for the rescuer’s kayak to be parallel to that of the victim to prevent a collision, and allow the rescuer to grasp the bow or stern of the victim’s kayak. By holding the bow and bridging his or her paddle across both kayaks, the rescuer’s bow is automatically at or near the victim’s hand. Another advantage is that the rescuer can keep the bow from swinging out of reach during the rescue by moving the lower body.
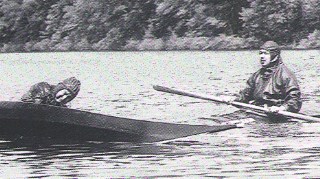
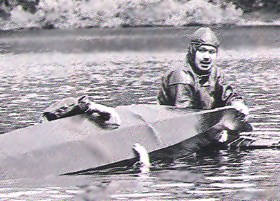 There are also Eskimo rescues for extreme situations, where a kayaker might get out of the kayak and have to be carried piggyback on someone’s afterdeck. This is extremely dangerous in cold water. There was a poignant story told by Dr. Alfred Bertelsen, a medical researcher in Greenland around 1900. Three brothers were out hunting in kayaks when one of them capsized. He exited his kayak after failing to roll up. His brothers managed to get him up between them, but he froze to death in their arms.