Sea Kayaker 2005 Readers Choice Awards

AT THE BEGINNING OF THIS YEAR we polled our readers to see what gear they liked best. Soon after our February issue came off the press, the survey forms included with it started filling our mailbox. As they came in, we keyed each respondent’s choices into a computer and counted the votes this summer. In the survey, we asked our readers to tell us what kayaking equipment they counted among their favorites. We left a lot of leeway for the responses, so the results here reflect some products that are new to the sport as well as some time-tested classics. Most of the vote-winning gear that has been around for a while has been through a number of changes. We’ve asked the manufacturers to provide us with a bit of history so we can see how even a good piece of equipment evolves to perform even better.
Many of the winners have been reviewed in previous issues of Sea Kayaker, and we are pleased the praise of our gear testers has been validated by the votes of our readers.
Thanks to all of you who took the time to complete the survey and to NRS for providing the prizes that added an extra bit of incentive.

The WhisperLite from MSR

For about 15 years, I used MSR’s original XKG, an amazingly durable camp stove that had quite a reputation for pumping out a lot of BTUs and decibels. It roared like a jet on take-off, and snow and ice were about the only things it wouldn’t scorch. The WhisperLite came out in 1984 with a name, I think, intended to let fans of the XKG know that MSR had addressed the noise problem.
Cranked up, it can put out the heat. It brought 16 ounces of water (a bit less than a liter) up to a rolling boil in 2 minutes, 45 seconds. Its three legs fan out from a compact folded position to form a stable tripod with a good base for pots and pans.
The WhisperLite burns white gas and needs to be primed to get the fuel line hot enough to vaporize the gas on its way to the jet. After the fuel in the primer cup burns off, you’re ready to cook. A flexible aluminum windscreen and base protects the stove from wind and concentrates the heat around the pot. There’s a lag time between tuning the valve and change of the flame, so it takes a delicate touch and a good ear to get the stove to simmer without sputtering out.
With the WhisperLite, a watched pot will indeed boil, but it will be less likely to char your dinner. (One of the more recent developments from MSR is called the SimmerLite. Maybe they’re trying to tell us something.)
The WhisperLite is a compact, light workhorse that will provide plenty of heat on cold days and nights when hot meals make all the difference. MSR reports that it has been one of their best-selling products, topping their sales list for the 1990s.

Performance Sea Kayaking: The Basics and Beyond from Performance Video

When Kent Ford of Performance Video and Instruction released Performance Sea Kayaking, there were lots of instructional videos for sea kayakers to choose from, but most had a homespun look to them. Ford’s production had a more polished, ready-for-prime-time appearance. His experience as a kayaker instructor trainer and world-champion slalom paddler didn’t hurt, either.
The hour-long video covers a wide array of topics from the gear kayakers need to rescues, rolling and expeditions. In the video, some first-rate kayakers provide the instruction. Olympic champion Greg Barton explains the forward stroke, Wayne Horodowich demonstrates self-rescue, and Tsunami Rangers Eric Soares and Jim Kakuk offer advice on paddling rock gardens. Roger Schumann, who reviewed the video in our December 1995 issue, rated Performance Sea Kayaking “one of the best sea kayak instruction videos around.”

Wayne Horodowich put his decades of teaching and kayaking experience into a series of videos. The fourth of those videos, ABC’s of the Surf Zone, is a three-hour class that starts with the basic skills and equipment required for any kind of sea kayaking. The focus shifts to techniques for negotiating surf. For kayakers who paddle exposed coastlines, surf presents the primary obstacle to getting off the beach and back again. The video looks both at finding safe passage through the least challenging areas of surf and seeking out challenging surf for the excitement of paddling it. The length of the production allows plenty of time for Horodowich to go into detail on particular techniques and to cover issues such as leadership and group dynamics that are of broad interest but might go without mention in shorter programs.
The ever-present Tsunami Rangers make appearances in this production as well, getting pummeled by waves and rocks for the sheer fun of it. Reviewer Gary Lai, commenting on the production in our 2004 issue, sums it up as “an excellent resource for sea kayakers new to the surf zone or experienced kayakers wishing to refine their skills.”

A Kayak Runs Through It

Though I log most of my paddling hours in the ocean, the idea of river travel has appealed to me ever since my mom read Mark Twain’s Huckleberry Finn to me when I was a kid. Piloting a boat on moving water that carves a sinuous path through ever-changing scenery offers peace, solitude and an intimate connection with the landscape, all for only a fraction of the exertion of paddling still water.
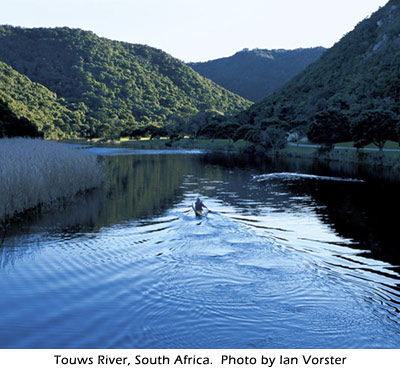
But what I find most alluring about river travel is the idea of using the forces of nature to go somewhere. A river is like a conveyor belt. Get aboard it, and it will take you places hundreds, even thousands, of miles downstream. In 1994, I set my kayak in the headwaters of the Missouri River. Seventy-seven days later, it had carried me 2,500 miles to its confluence with the Mississippi. Looking back, I was terrifically unprepared. But time and necessity forced me to learn, and later to recognize problems before they occurred.
I made more than a few mistakes, but the inevitable mishaps are a small price to pay for the pleasure a scenic river has to offer. Because sea kayaks lack the maneuverability of comparatively short, whitewater kayaks, our focus here is on navigable rivers that are high on beauty and low on the risks inherent with fast-moving water. Still, even the tamest river has some hazards you’ll need to consider before striking out on your own.

It’s important to learn as much as you can about the river before you get wet. Good maps are a must—not because it’s easy to get lost on a river, but because you need to know what you’ll encounter downstream. Are there dams, bridges, locks, rapids or sharp, turbulent bends coming up? Are there wide reservoirs where the wind can whip up a chop? Where are the best places to camp or take out? A map will tell you what you need to know beforehand so you’ll have time to get in position to avoid hazards or come safely ashore. Even on slow-moving rivers, you need to allow yourself time to move to the side of the river that will take you where you want to go.
A river outfitter near the waterway you intend to paddle is likely a good place for maps and information. If that’s not possible, go to www.usgs.gov to order U.S. Geological Survey maps. To find a listing of U.S. Army Corps of Engineers maps, go to http://bookstore.gpo.gov/, type “maps” in the search engine, and a watery wilderness unfolds before you. These sites will also give you the water levels, continually updated from data recorded at gauging stations along the rivers. That’s important because if the river you want to paddle is barely deep enough to wet your aqua socks, you’ll need to alter your plans. In addition, www.outdoor-resources.com/rivers features trip reports, maps and other recommendations about rivers across the country.
Not typically being one for lots of planning—I tend to subscribe to the “get up and go” philosophy—I did do a fair bit of planning before my Missouri River paddle, but it wasn’t enough. When I arrived at the Red Rock Reservoir (the true source of the Missouri) in southwest Montana on April 3, huge patches of ice made paddling all but impossible. When I’d left my home in New York City, birds had been chirping and buds blooming; in Montana, it was still bitterly cold even during the warmest part of the day. I was able to put in below the dam in the swift current of the Beaverhead, but if I’d made a few more calls (this was before the Internet), I’d have planned to arrive later and would have shivered a whole lot less.
Just as important as knowing how to read your map is making sure you maintain “contact” with the cartography when you’re on the water. This is particularly useful on vast tracks of the Missouri through Montana, where it can be a week’s paddle between towns. If you know, for example, that there are three bridges, two islands and a tributary along the route—all marked on a detailed topo map—you’ll not only know when you’re nearing your destination, but you’ll eliminate a lot of the guesswork that can be stressful. If you have the Army Corps of Engineers charts in a clear plastic casing on the deck of your boat, you can even count the bends in the river for a more precise location. Like coastal waters, navigable rivers also have aids to navigation—day markers, lights and buoys—that you can use to find your location on the chart.
On rivers with huge reservoirs like the Missouri and Mississippi, a GPS will come in handy, especially if fog rolls in. Remember to take a compass as well, and know how to use it. If you don’t, count on your GPS to die in accordance with Murphy’s Law of Electronic Navigation.

Before I set out on the Missouri, a friend who grew up paddling out west warned me to tie my boat down even if I just needed to take a step away to relieve myself. A boat carried away by an ocean tide may drift off slowly, but a river will not give you the luxury of turning your back on an unsecured kayak.
Rivers aren’t subjected to tides, but a number of factors can change the level of the water. During my Missouri River trip, I camped on the shore of Lake Oahe, a 230-mile-long reservoir in the Badlands of North Dakota. I had pitched my tent about 100 yards from shore. When I crawled into my sleeping bag, the lake was flat. By midnight, lightning flashed across the sky and whitecaps rolled across the lake and around my tent. Bobbing in the chop was my loyal kayak secured to a downed tree; the rope was pulled as taut as a leash restraining a rabid dog. If I hadn’t tied it to the tree, it would have been long gone by the time I peeked out of my tent.
Rainfall is the other big variable to consider when you’re camping along a riverbank. One night I set up my tent on a small empty island smack dab in the middle of the Missouri. After an all-night rain, I emerged to find precious little dry real estate. In addition, if you’re on the water when the heavens open up, beware that the run-off can dislodge tree trunks, branches and other debris that can cause an impasse at a tight bend, in front of a sand bar or around a lock.

GO WITH THE FLOW OR GO SLOW

Even with navigable rivers, it’s important to know how to read the water and learn how to negotiate the bends in the river. If you’ve done some whitewater boating, you’ll know what to look for, though the telltale signs may be subtler. If you’re new to river paddling, you’ll soon learn that, on serpentine sections, the fastest water runs along the outside of the bend. The banks there are often steep as the river cuts into the land. The water on the inside of the bends moves slowly, often depositing sediment and creating gently sloped sandbars. On the straighter sections of the river, the quickest line is in the center, or in the deepest section of the river. If you’re heading downriver and you see white riffles—this generally means rocks—look for the downstream (or upside down) V in the water and shoot for the middle. “Go with the flow” and you’ll make good time downstream. If you’re paddling upstream, you’ll hug the inside on the tight turns and run the bank that sports the slower water.
There are a few things that will mess up your flow: downed trees, rocks, logjams, shopping carts, wrecked cars and beaver dams, to name a few. The key to safe river paddling—to be painfully obvious—is to avoid obstructions. The best way to do that is to anticipate hazards and make your move well upstream of them.
Let’s look at the most common hazards you’re likely to encounter along the way: Overhanging branches, if they’re not too low, are generally innocuous. On a narrow river, I often have to cruise under the highest part of the branch; on a wider river, it’s easy to avoid them completely. The key here is to make sure you don’t pass too close under a dangling branch and get snagged. If the branch is low, lean forward, not back. You’ll be better off if you take a scrape on the back of the head than on your face.
Estimating the clearance accurately may be tricky, so give yourself a healthy margin for error.

Paddling on the Susquehanna in central New York last spring, I ducked under a branch. I didn’t duck low enough, evidently, because it hooked the shoulder strap of my PFD and plucked me out of the boat. The bad news is that it was March and the frigid water took my breath away. The good news is that my paddling partner that day has only to think back to that hilarious moment when he’s feeling blue and cheers up instantly.
As rivers erode their banks, they often undercut trees. The trees will fall into the river but stay rooted to the bank. They become what whitewater boaters call sweepers or strainers. They’re downed trees that create a picket-fence barrier of branches that allows water through but won’t let your boat pass.
If you can’t avoid a strainer completely, paddle as far from the trunk as possible to get away from the larger, stiffer branches. If the current pushes you against the strainer or any obstruction, lean downstream toward the obstacle and try to hold on long enough to quickly assess the situation and get yourself out of harm’s way. Leaning upstream away from the obstacle is likely to lead to a capsize and may trap you underwater.

On the Missouri, where the dams are large and easily seen from a distance, I came to see them as both a blessing and a curse. A blessing because it meant I’d be able to leave the work of paddling still water and get back to going with the flow; a curse because it was time to get out and walk—a sizeable chore with a fully loaded kayak.
While most of us think of dams as large visible walls rising above the river, that’s not always the case. Wing dams, which are typically stone jetties built perpendicular to the shore to narrow the channel and increase the current, are often a hazard because they’re unmarked and frequently underwater when river levels are high. On wide stretches of a working river, you’ll be fine if you paddle near the middle (but stay clear of the marked channel used by larger boats). If you’re near the bank and spy a marked change in the pattern of the river, beware. Some obstruction may be lurking just below the surface.
Smaller dams that let water spill over may look runnable, but the recirculating water at the bottom of the dam is an accident waiting to happen. Known as “keepers,” this tumbling water can trap and submerge small craft. Always consult your map to see if there’s a dam on your route; if so, look for signs that tell you where to take out and portage around it.

Diversion dams shift the river to a canal and raise the water level without creating a significant pool of still water. On the Missouri, I learned this the hard way. Though I noticed a diversion dam was marked on my map, I didn’t know what one looked like. As I headed downstream, the submerged barrier was nearly invisible. I noticed that the river had slowed down some and I heard the rush of water, but I discovered the four-foot drop over the dam only when it was too late to avoid going over it. I splashed down on the other side, my heart racing. A motorist who’d stopped to watch honked with delight. I flashed him the cool-guy thumbs up and thanked the God of Diversion Dams for not shattering my boat. I have yet to make that mistake again.
Revetments, sections of large riprap stone lining the banks, are built to redirect the flow of the river and to prevent bank erosion. On the lower Mississippi, for example, it can be difficult to get out of these channelized sections, especially if there’s a lot of boat traffic nearby. Revetments are usually marked on river charts, so you’ll know where they are and can plan your day so you don’t get trapped on the river when it’s time to come ashore for lunch or find a place to crash for the night.
On navigable rivers, dams are accompanied by locks that carry boats between the upstream and downstream sides of the dam. On the Lower Saranac River in upstate New York, for example, the locks are small and fill up relatively quickly. Look for the lockmaster or a sign instructing you how to “lock through.” When locking down, the water stays pretty quiet, but be prepared for some turbulence when locking up.

With some of the larger locks, it can be quicker to carry around, especially if there are boats in front of you. Paddling up the Mississippi, I came to the massive lock at Alton, Illinois, the historic river town near the confluence of the Mississippi and Illinois rivers. The carry through town seemed nightmarishly long. On the other hand, the lock was designed for boats approximately 1,082 feet longer than my craft. I told the lockmaster what I was up to and he said that if I didn’t mind sharing the space with a supertanker, I was welcome to paddle on in. And so I did. An hour later, after graciously allowing this floating city block to exit first, I paddled up river to the less hectic Illinois.

After a fair bit of paddling on rivers near and far, I’ve come to the conclusion that the most dangerous hazard on the water is posed by other vessels. Rivers can get very busy with barges, tugs, tankers, ferries and, especially on a sunny summer weekend, speedy pleasure boats. Keep your eyes and ears open, just as you would in a busy coastal port.
There is an unusual phenomenon created by large boats on rivers that you don’t find on larger bodies of water. Two months into my trip on the Missouri, I rounded a bend and a long tow of barges—silent, and all but hidden in dusk’s grainy light—loomed over me like a five-story building, moving fast. I’d been warned that water gets sucked into the “vacuum” created by barges pushing upstream. The river ahead of the barges quickly recedes from the bank—stranding you if you’re too close to shore—to be followed by the wash of the wake. I had no choice but to paddle furiously toward the bank. I reached shore, but before I could get out, my boat was pulled back by the falling water. I threw my paddle down, clung to a large rock on the bank, and narrowly escaped being sucked toward the lead barge.
This sounds terrifying, and it was, but it could have easily been avoided if I’d paid more attention to my position on the river and anticipated upstream traffic. Because of the narrow confines of rivers, it’s especially important to avoid paddling after dark, especially on a river with heavy commercial traffic. Low–lying fog is also very dangerous, since tugs will operate if they can see over the mist. If visibility is poor, your best way to avoid a collision is to get off the river.
Even when visibility is good, you should remain outside the shipping lanes. On navigable rivers, the channel is marked by red buoys or signs along the left descending bank and green on the right descending bank. Paddle inside those markers, and you’re barge bait. Remain outside the channel, and the biggest hazard is getting hooked by a fisherman. If you assume you’re invisible to boat traffic, you’re likely to have far fewer scares. On some large rivers, you can monitor the locations of barge traffic on a VHF radio—the bends of the river are often named.
Here’s the good news about paddling around big working boats. When I set out on the Missouri, I was told that the barges I’d encounter downriver could kick up a wave as much as 10 feet high. The implication was that I didn’t stand a chance in my little boat. But while a fully loaded barge kicks up a plush wave, these large gentle rollers are little more than exciting diversions. If the thought of a big barge wake leaves you in a panic, try this: Wait until the wave is near and turn into it so that you take it bow on. Eventually, you’ll get so comfortable, you’ll be chasing the bumps to catch a cushy ride. Note, however, if you are quite near shore, the waves will get steeper and break as they hit the shallows.

OLD MAN RIVER

When we paddle coastal waters, we see the water and the land locked in what seems to be a timeless standoff. The landscape is often little changed from what explorers saw hundreds of years ago. Rivers, especially those meandering across the lowlands, are not so constant. Being in a continuous state of flux, they serve as metaphors for the passage of time and for transformation.
Many cultures around the world consider rivers magical, even holy. Artists, inventors, writers—from Leonardo da Vinci to Henry David Thoreau to Herman Hesse—have found inspiration in the moving water of rivers. As Mark Twain wrote in Life on the Mississippi, “The face of the water, in time, became a wonderful book—a book that was a dead language to the uneducated passenger, but which told its mind to me without reserve, delivering its most cherished secrets as clearly as if it uttered them with a voice. And it was not a book to be read once and thrown aside, for it had a new story to tell every day.”

Kayak Bill – A Requiem

Kayak Bill found his freedom under a regime of strict necessity, first on a wilderness of vertical rock, then in the wilds of a horizontal ocean. His goal was to be as independent of civilization as possible. By reversing civilization, he succeeded. For the last twenty-eight years of his life, Bill returned to a hunter-gatherer way of life. He must have spent more time than anyone in a sea kayak since aboriginal peoples left kayaks, as a way of life, behind. “Perfection consists in doing ordinary things extraordinarily well.”

The first time I met Bill, it was 1968 and I was fifteen. He was working at the only store in Calgary (Western Canada) that then carried climbing gear. He sold me on buying the best hiking-climbing boots available. Bill’s enthusiasm and ready smile that day formed a memory that I’ve retained for 38 years.

Later, I found out that Bill Davidson was one of the hard-core climbers in the Calgary Mountain Club, part of a mountain climbing world to which I aspired. They were pushing climbing past the edge of the possible into what was only marginally sane. These were the kinds of guys who, had they not encountered mountains, would have excelled as Hell’s Angels. Many of them died with their climbing boots on.

The second time I crossed Bill’s path was my first day rock climbing. On a long rock face, my two high-school buddies and I picked the easiest route, a diagonal crack system. As we climbed through the crux, my nervousness abated as I realized that this was not that hard. Then we heard a shout. Puzzled, we looked over to a wall of blank limestone the size of a medium office tower. There was a person, although there was no ledge or crack big enough for a toenail. As we clambered nearer, we could see he was standing in two rope slings, leaning back away from the rock, smoking a cigarette. He yelled, “Hey, you guys. My backup bolt drill broke. I’m stuck. When you get down, see if you can get somebody to come up and lower a drill, from the top.” We did as he asked but nobody had anything useful to lower down.

The next morning Bill improvised his own gear repairs and rappelled down his climbing ropes. I had never conceived of the possibility of spending more than an afternoon on one of the steepest rock faces in the Canadian Rocky Mountains—that was Bill—nonchalant about spending a night hanging from his hand-drilled, hand-made bolts, 500 meters above the broad prairie.

Bill wrote an elaborately understated account of a climbing route on Mt. Gibraltar that he named, Nine Nightmarish Nights on Nothing, which never has been, and I expect never will be, repeated. As with many of his routes, he spent weeks going up and coming down until he wore a route up the rock. While solo aid climbing a section he took a 35-meter fall, gashing his head. He hitchhiked back to Calgary covered in blood. With his partner, Bill’s final ascent took nine continuous days on rock mostly beyond vertical. Then I heard a rumor about Bill taking a fifty meter fall on a solo climb—a fall that should have killed him. After that—nothing.
***
A dozen years later my mate Heather and I were paddling our double-seater sea kayak northeast of Vancouver Island toward the village of Echo Bay. The spring rain and sleet had briefly let up after a week of gloom. Through a hole in the clouds the sun was gleaming off the dark water when the biggest kayak that I had ever seen crossed our path. As the paddler approached, I saw that his kayak was a meter longer than our six-meter boat. On it were two large downriggers, one to each side of his front deck, for salmon fishing. We exchanged only a few words, as a wall of dark cloud was advancing, then we paddled off in opposite directions. Although I didn’t know it then, I had met Bill Davidson for the third time.

We asked the clerk at the Echo Bay general store about the kayaker, “Oh, that’s Kayak Bill. He has a camp at Eden Island, and a bunch of other camps around. He does a few odd jobs sometimes, but mostly he lives off the land. He started off from Vancouver about ten years ago to paddle to Alaska, but after wintering at Eden Island, he said he didn’t need to go any farther.”

Several years later, while camped on a tiny island near the Ivory Island lighthouse, we found a camp tucked away in the woods. The fireplace was unlike any other, three pieces of split wood of chest height had been driven into the ground forming a triangular column; two platforms of hand-split wooden slats were lashed together at navel and chest height. At the base several flat stones contained a bed of coarse sand and ashes. The fireplace was built for cooking at the bottom and for smoking food on the slats above.

The hollow of a cedar tree held two milk crates. The crates contained the tidiest firewood I’d ever seen; each piece was cut to precisely the same length and split to the exactly same diameter. The camp was situated so it would take minutes to string up ropes and throw up a tarp. Usually places where people make camps and fires are a mess—this was immaculate. Thumb-tacked to the fireplace was an empty package of Zig-Zag cigarette papers, the signature of Kayak Bill. Back home, I occasionally thought about Kayak Bill alone on an island somewhere out there. When I mentioned him to a long-time mountain guide, he told me, “Oh, that’s Billy Davidson; you must remember him from the Calgary Mountain Club.” He told me that Bill was raised in an orphanage and that he was a mechanical and electronic whiz kid; out of scrap metal and scrounged parts, for a provincial high school science fair he built a three-meter high robot that could pick up and crush a pop can. Bill took top prize but the orphanage could not afford to send him to the national competition. Years later, Bill soldered together a bunch of scavenged electronic parts into an early music synthesizer.
Over the years, Bill’s camps migrated northward as the more southerly kayaking spots got popular. Some of his camps were repeatedly trashed. He departed the Echo Bay area after the Forest Service tore down his Eden Island camp. One of his Goose Island camps was kicked apart more than once by native kids from Bella Bella. While chatting on a beach a fellow kayaker told me that he had met Bill at the south end of Aristizabel Island. Bill had told him that his main camp was somewhere in the vicinity.

On other kayak trips, I heard stories of Kayak Bill shooting deer and drying the meat. I was told he would rub himself with layers of rendered seal grease for sun and bug protection. He must have smelled ripe after cooking over open fires for months. There was a mention of a base camp out in Queen Charlotte Sound, near Goose Island, but in our two trips there Heather and I found only a couple of his temporary camps on some nearby islands.
In 1999, as we were returning from a two-week trip that had taken us near Aristizabel, we had camped on a pocket beach of clean sand facing the Pacific Ocean. After supper a kayaker paddled into view in a huge green and white kayak. He was using a homemade paddle double the length of our own longish paddles.
His complexion was so dark he no longer looked Caucasian. We squinted at his halo of frizzy hair backlit from the setting sun. Shielding her eyes, Heather asked, “You Kayak Bill?” “Yup,” he replied. He told us he was exhausted, as he had just paddled in one day what had taken us three days to cover. He gave us a warm invitation to visit his camp next morning—“It’s just around the corner, you’ll see my kayak on the beach”—and he was gone. When Heather and I woke the next day, impenetrable fog blanketed everything; we could not find his camp. That was the last time I saw him.

On a subsequent trip, I met Bill’s kayaking and artist friend Stewart Marshall camped on the shore of a rocky lagoon. He told me Bill had occasionally stayed on Malcolm Island off the northeast corner of Vancouver Island. For a period Bill had lived with a woman, they had a son they named Westerly after a fair wind, but Bill could not handle four walls permanently surrounding him. Bill came and went, but mostly he went.
I had long contemplated a kayak trip out toward Bill’s haunts in the hope of blundering across his path again. For me Bill embodied an ideal of self-sufficient competence. There was my curiosity about him, and there was something curious in how his path had repeatedly crossed mine in ways that were of consequence to me and inconsequential to him. But, there was no possibility of phoning or writing somebody who regularly spent ten months of the year alone on uninhabited islands. Even if I could have found where his camps were hidden, I doubt he would have revealed himself.

I needed to cross his path out on the ocean and to see his expression when I asked him about the robot. I wanted to know how he gathered clams and mussels and how he smoked his deer meat. I wanted to know how he could gauge the weather, waves, and currents so well that he never had an accident.
If he had ever misjudged the weather and flipped his loaded kayak, I doubt Bill could have righted it. It seems he never carried a lifejacket. In the places he paddled, there was nobody to rescue him, anyway. Even minor injuries, a slip on seaweed on a rocky beach dislocating his shoulder, or a single slip with an axe, or paralytic shellfish poisoning, could easily prove fatal. His safety lay in his solitary discipline. I knew from some of his friends on the coast that he often rehearsed his steps before carrying his kayak ashore and he always practiced packing and repacking his kayak before trips. All his trips were big, I never heard of him doing a moderate climb or less than a few months paddle. He needed an edge of danger to keep his skills and judgment honed.

The next I heard about Bill was a terse article in an American hiking magazine. I read that in March of 2003, near Goose Island, a deer hunter from Bella Bella had discovered Bill’s body at the edge of the sea, the cause of death undetermined.

Then in 2004, a poster appeared in Banff, where I live, featuring a smiling young Bill, climbing rope draped over one shoulder. There was to be a memorial service for Bill. I couldn’t attend. Some time later Heather discovered that her workmate, Perry, had been a buddy of Bill’s in high school. Perry told me more about Bill. They had done a ski-touring trip as teenagers. Bill did not have money for ski boots or for climbing skins for his wooden skis, so he adapted his homemade mukluks for boots and, he glued leather strips to his ski bases for skins. He glued the leather strips so they spelled out “far out, far out”— in the snow for 60 kilometers.

Perry showed me copies of Bill’s last journals and some of his charts. An idea came to me with a rush of goose bumps: I could not cross Bill’s path again, but I could parallel it by following his recorded camps out to the tiny group of islets out in Hecate Strait where he spent much of his last decade.

The route required five open-water crossings, each over 20 kilometers. I told myself that it shouldn’t be too risky, even though it looked exposed on the charts. After all, Bill paddled this route in much rougher winter weather. Bill recorded how he packed his kayak solid with 180 kilos of food and gear, sufficient for five months. He noted that he had just one centimeter of freeboard on his last trip to the islets; his kayak must have been closer to a submarine than a boat. I had a fancy, fast kayak with less than 35 kilos of food and gear. By moving faster than Bill I figured that I would be less exposed to the risks of changing weather.
I disembarked from the coastal ferry at the Kitasoo/Xai’xais village of Klemtu. The unusually strong flood current pushed me north. I had accidentally timed the turn of the tide perfectly so the ebb current then drew me west through narrow, rock-studded Meyers Passage. Elated at my fast progress, I went farther than I had intended, well past the few good camping spots.

I camped at the highest spot in a damp meadow squeezing my tent into the dense old cedar forest. Suddenly, I woke in the night, floating on my sleeping pad; I jumped naked out into darkness and ankle-deep water, telling myself the tide could not get any higher. For an hour, the water crept up almost to my knees, not until 3:30 AM did the tide fall enough to drain the tent. I was shivering as I groped my way into a sopping sleeping bag. In my rush to catch the ferry I had neglected to buy the tide tables that would have told me that that evening had the highest tide of the year.

I cursed myself until dawn for getting cocky. As I retrieved the wet gear that I had tossed into tree branches the night before, I found that the dry bag containing my extra charts, and my photocopies of Bill’s journals had drifted off. The supposedly waterproof case for my VHF radio had water inside—now I had no weather info and no Coast Guard rescue if I made a mistake. If I continued, I would be doing this trip too close to Bill’s style of travel, relying only upon myself. What I needed was to take more time, to sit until I had thought things through, like Kayak Bill.

After two days of drying gear out and watching the weather, I was out of bed just after 4:00 a.m., to cross Laredo Sound on a blue sky morning. The first breath of wind arrived just as I reached the ten kilometers of cliffs along the east side of the island. In minutes I located a Bill camp above a tiny beach in a break in the cliffs.

The camp was invisible from the water. Behind the bushes, a wall of driftwood three and a half meters high and six meters across protected the camp from prevailing winds. I continued southward into an archipelago dense with small rocky islands. Bill could safely paddle in here even in gale-force winds. He had situated his camps so he could sit out weeks of bad weather, waiting for the moment of calm, to make the exposed crossings.

After two and a half days of waiting at another of Bill’s camps, the winds unexpectedly calmed. I paddled off in the late afternoon into a slow two-meter swell. A few kilometers out from shore, a light breeze swept a thin layer of fog towards me. Missing the islets would mean a frightening, miserable night bobbing around in the Pacific Ocean, but I had an unusual confidence about continuing.

Soon I was enveloped by fog, but instead of diminishing the light, the thin fog diffused and amplified it—while the bow of my kayak stood out with an intense clarity—everything above and around was suffused by a directionless whiteness. The fog obliterated the islets, but a shimmering golden line from the setting sun still shone through, the slowly undulating reflections acted as a beacon guiding me straight onwards. In the distance I could hear several immense humid whale breaths, a pause, and then a few more breaths, no way to tell how far off. I stopped my steady paddling pace once, to hear distant swell breaking on rocks ahead. Using my ears as sonar I swiveled my head from side to side, I was on track.

Twenty minutes later, I arrived exactly where and when I needed to be after four hours on a bearing of 270 degrees. As the larger outer islands were mostly exposed rock and surf, I had to enter the islets exactly at that place to paddle through a protected channel into the middle islet. And I had to arrive at high tide, for at low or even medium tide, a reef of several square kilometers around the islets dries, blocking the access. I made a right turn into a channel flanked by dark rocks, where the water immediately calmed. As the sun set a few bonsai-shaped trees were starkly outlined by the golden fog. Two white fishing floats tied to separate trees marked something.

Why would Bill put up markers in a place he didn’t need to mark? Without those floats, I couldn’t have found a place flat enough for my tent. As I walked along an overgrown trail to Bill’s north camp, I had to veer around spiny Devil’s club bushes. In the last twilight, I threw a tarp up over the three beams, sat down on his raised bed of fitted planks, and tore into a plastic pouch of organic, free-range, smoked chicken.

The next morning, it took me five minutes to locate Bill’s south cabin. The north camp was a backup. A winter storm had once piled up waves high enough that Bill woke up in his cabin floating on his thin foam mattress, even though his bunk was two meters above high tide. Like his other camps, this was the size of a four meter by six meter plastic tarp. Unlike them, this place had a permanent roof with three and a half walls (the east wall was half open). Every piece of the cabin showed that it had been cast up by the sea.

The fireplace was like the others but more substantial, a double layer of thin, flat pieces of granite were closely fitted around the base with an empty pop can and coarse sand insulation in-between. Bill could have hot fires in here without burning the place down. There was an ingeniously arranged rack of moveable heavy bolts to hold pots. The bolts were from the boiler of a nearby shipwreck.

There were five cups, a dozen oddly shaped bottles along a shelf, a few eagle feathers, some plastic drums, three chests for storing food and a large perfectly intact sea-urchin shell. The only food was a small bag of chocolate pudding mix and three chocolate Santa Clauses—Bill had a sweet tooth. But there was no chimney. How could he live in the smoke? I made a small fire from his meticulously stacked firewood. The wall of driftwood just outside of the cabin faced the prevailing wind, creating a wind eddy, so the smoke was drawn up and then out under the roof line. Standing up I choked, but sitting on Bill’s bed, the smoke flowed out two feet above me. With a hot fire it would be warm in here even in winter. Outside the door, an open box three meters by three meters contained the remains from his staple diet, clam and muscle shells as big as my hands, heaped to chest height. This was no Hollywood castaway Tom Hanks; this was Robinson Crusoe for real and by choice.

Clearly, nobody had visited in the two and half years since Bill left. His Shearwater friends, Andrea and Bryan, had informed me that Bill’s health had lately deteriorated. A lifetime without dental care had left him with excruciating toothaches. His aching teeth and age (mid-fifties) had slowed him down, so he had not made it out here for a couple of seasons before his death.

No fresh water here, but I spotted another fishing float across the now dry channel. At low tide Bill’s islet connected with the two larger islands and to many small rocky islets. I found his well in the forest; he had punched the bottom out of a large plastic bucket and dug it into a damp spot in the forest floor. It must have taken him a couple of hours a day to gently dip out and haul water. He would have been busy what with, getting water, cooking, gathering food and fuel taking up most of his daylight hours. This place did have two advantages: Nobody would find this camp to wreck it. And, no flowing or standing water meant no mosquitoes or black flies. Bill hated bugs.

The next morning, I left under ideal sea conditions. Except for briefly paddling across the path of the coastal ferry, the six days back to Shearwater were pleasantly uneventful. In the Shearwater bar, I may have chewed the ears of four kayakers from Seattle, as I had not spoken for eighteen days.

Bill revealed something to me. Being alone out there—is not lonely. My loneliness disappeared as soon as I left people behind. Loneliness, it seems, appears in the presence of, rather than the absence of, people. Maybe Bill wasn’t seeking solitude as much as he was evading the loneliness he felt in civilized places. My loneliness arose in the last two hours paddling toward Shearwater to catch the ferry home. As I bobbed in the wakes from a procession of luxury yachts, I began to envy them. Besides being designed for water, yachts are also designed to inform those of us who cannot afford them, how deficient we are for not also having on-board microwave, satellite television, stocked bars, and hot showers.

The course of Bill’s life was opposite those too fast, too big, too white, and too expensive yachts. His path was to live with less, rather than impressing with more and more. Bill found an answer to his quest: What is the minimum that one man needs? He had no social insurance number, no health care, no credit card. His journals show that in the few months a year that he was in a village his budget was around two hundred dollars a month. I don’t know what kind of grubstake he needed to fill his boat with flour, sugar and a few Bic lighters, but it couldn’t have been more than several hundred dollars a couple of times a year. He became an artist, self-taught of course, partly to earn the little bit of money he needed.

Bill occupies a place in my imagination because he reversed the course of civilization. Except for Bill, civilization is a one-way trip. Once hunter-gatherers, be they in the Amazon or in the Arctic, enter a money economy and find out what life is like when they have pots, an axe, or a gun, a motor for their canoe, a snowmobile, or a permanent roof—they cannot go back. Once entered, civilization inexorably seduces us into the whole catastrophe: a job, a bank account, a mortgage, and then the yacht payments. Bill lived up to Henry David Thoreau’s phrase: “That man is richest whose pleasures are cheapest.”

In a material sense, Bill’s wake was as ephemeral as the wake from his kayak. However, I doubt that he realized the emotional wake he had left behind. Those who met him remarked on his smile and charisma, the opposite of the hermit image. He liked people even if he could not handle crowds and his idea of a crowd was three or more. I can understand going out into the wilderness for weeks, for months maybe, but for nine to ten months every year for twenty-eight years. What could possibly motivate anyone to that extreme?

From Bill’s friends, Perry Davis, Stewart Marshall and Andrea and Bryan Clerx, I gleaned a bit about Bill’s early life. When Bill was six, his mother disappeared. Bill’s father deposited his four children at a Calgary orphanage. From the age of six, onwards he had to be self-reliant. Bill’s younger sister was quickly adopted. Bill, his other sister, and his older brother lived in the orphanage until they finished high school. Bill’s father visited his children but they never had a family life. The separation and the orphanage must have branded into Bill an emotional pain and an equally deep resolve to become so self-disciplined and so perfectly self-sufficient that he inured himself to physical hardship and risk; to living on the vertical edge in his teens and twenties; to living at the edge of the ocean and beyond the edge of civilization for the rest of his life.

Bill began living off the land by running away from the orphanage. At its western edge, Calgary then had some forests where he could hide with food stolen from the orphanage, until hunger forced him back. As he got older he got better, staying away longer, learning to live from the land. Then, on a summer school outing he found a place that fit. On an easy scramble up the backside of the same rock face where he would later spend months on the vertical front side struggling against gravity, Bill later wrote in a published article, “When we got to the top, I was transfixed. The great height seemed to have me spellbound. Right from then, I knew I would be doing more climbing.” Through his iron discipline, he quickly developed mountain skills, which brought him into the frontier of rock climbing. In a few years he was doing the then hardest aid climbing routes on the planet. Through painstaking preparation Bill took on immense risks. He brought the same patient approach to his kayaking. Most of what happened to Kayak Bill out there will remain unknown. His terse journals recorded only what he needed to track, the weather, how much flour consumed, and how many lighters left. Bill made his last journal entries in December 2002. On the sixth he wrote, “Light rain showers. Lots of stew, plus sweet rice dish. Lower back and stomach pains.” For the morning of the seventh, he wrote, “Overcast with light rain showers and very light west wind. Fog and drizzle with winds light from the north and northwest by noon.” After that—blank pages.


Martin Leonard—A Passion for High-Performance Touring

In the world of performance kayaking, there are paddlers whose accomplishments are so renowned that they become household names: paddlers like Paul Caffyn and Ed Gillet, Oscar Chalupsky and Greg Barton. Then there are those who remain resolutely out of the limelight, like Martin Leonard III. Leonard made a splash in the kayak community during the early and mid-1990s when he crossed the Bering Strait from Alaska to Russia, then paddled the fabled Inuit (Northwest) Passage from Alaska to eastern Canada. Since then, he’s slipped back under the radar, all the while quietly pioneering a new brand of performance kayaking that blends innovative boat design with specialized skills and a unique philosophical approach to expedition touring and surfing. That philosophy is unfailingly holistic—from his knowledge of ocean conditions to the food he eats and the sunglasses he wears. “You don’t need a $4,000 boat and a carbon-fiber paddle to be a performance paddler,” explains Leonard. “It comes down to the entire system.”

Over-the-Side Speed Rescue

Real-life capsizes don’t often happen in flat, calm conditions. If they do, then a rescue rarely poses a problem. But in much more challenging conditions, such as strong tidal streams, vicious winds and breaking waves, it may be essential to get a paddler back in the kayak as quickly as possible. A speedy rescue can prevent an incident from turning into an epic and can make you and your paddling friends into a safer kayaking unit.
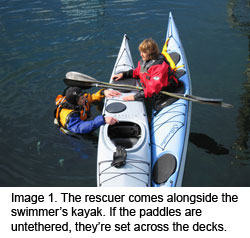
Preparation is the name of the game. Making sure everyone in the group knows what to do in the event of a capsize will significantly boost the group’s overall safety. Communication is crucial. Practice may not always make perfect or permanent, but it will help highlight the difficulties that “real” capsizes cause, and it will develop a system whereby a group has a better chance to rectify the situation.
Generally, when someone capsizes, it’s because the conditions have become, even if just momentarily, too difficult for the paddler to remain upright. Ideally, the capsized paddler would roll back up on every occasion, but in reality, that isn’t going to happen. If the capsized person bails out, it usually means that the conditions for an assisted recovery will not be straightforward. Capsizes that occur where there is danger posed by rip tides, breaking waves or rocks require swift and decisive action. Let’s look at a technique I teach called an “over-the-side speed rescue.” This is the only assisted rescue technique I teach to my students, and it’s the one I use in nearly all rescue situations.
Someone capsizes and takes a swim. This swimmer should shout or blow a whistle to alert the rest of the group. Anyone in the group who sees the capsize should do the same. It’s important that the group remain together: Even if some of the paddlers in the group are not needed to assist in the rescue, they should stand by and not proceed until the rescue is complete and everyone is able to paddle again.

If the kayak is upside down, the swimmer should leave it that way and make his way to the end of the kayak. It doesn’t matter whether he goes to the bow or the stern. He should go to the safest end if there is one and if the option exists to do so. He should also keep hold of his paddle. Allowing the paddle to float away just creates another problem to deal with and can burn up valuable time or put others at risk. Paddlers may wish to consider using a paddle leash when appropriate to the circumstances so that the paddle can’t become detached. It’s worth practicing with the paddle tethered to the boat to see if you have a preference.

The rescuer approaches and comes alongside the capsized kayak. In rough water, it may be best to approach the middle rather than the ends of the capsized kayak, and be aware of the danger posed by the rolling and pitching of a semi-submerged boat. The orientation of the two kayaks doesn’t matter. The rescuer doesn’t need to align the kayaks so that the bows and sterns are facing the same way or opposite ways, as in other rescue techniques. Having to maneuver and turn a sea kayak around in calm conditions can be time-consuming enough; to do so in rough waters under pressure to rescue someone wastes valuable time and leaves the swimmer in the water much longer than is necessary. It’s generally recognized that body heat is lost about 20 times faster to water than it is to air. Even dressed for the conditions, cold water will have an adverse impact on the swimmer. The faster you get someone out of the water the better.
There’s no need to try to remove any of the water prior to getting the swimmer back aboard. Taking the time to drain the cockpit just leaves the swimmer in the water longer. If, say, the capsize took place in a cave or near some dangerous rocks and the kayaks were being swept onto them, then trying to empty the kayak would leave both rescuer and swimmer in the danger zone for longer. The main aim is to get the swimmer back into his kayak and out of danger as quickly as possible. The rescuer and swimmer can work together to flip the kayak right side up. Righting the kayak with the help of the swimmer puts much less strain on the rescuer. With certain rescue techniques, the rescuer lifts the kayak to drain out the water, but this can pose a real risk of back injury, especially in rough or moving water.
After the swimmer’s kayak has been righted, the rescuer leans onto it and, by doing so, makes a very stable raft. In rough conditions, this provides stability for the rescuer and a solid platform onto which the swimmer can climb. At this stage, some rescuers consider using a stirrup to help rescue the swimmer, but again, this method leaves the swimmer in the water longer. Even dressed in full immersion apparel, a swimmer will weaken if left in the water for too long. The advantage offered by a stirrup may not be necessary, as you’ll see.
The swimmer makes his way to his cockpit, or just aft of it, on the outside of the raft. It is important that the swimmer does not let go —properly fitted deck lines will prove invaluable here. If the swimmer’s paddle is not tethered, this is a good time for the swimmer to pass his paddle to the rescuer. By coming on the outside of the raft (rather than in-between, as in some rescues), the over-the-side speed rescue has several important advantages. A swimmer that comes between the kayaks as a way to get back aboard always has the risk of being hit, usually on the head, by one of the kayaks. As most sea kayakers paddle without a helmet, this is a real hazard. The risk of impact is obviously less if the swimmer comes over the side. It’s also easier for the rescuer to hold the two kayaks together if the swimmer isn’t between them, forcing them apart.

The rescuer puts both paddles together across the raft and tucks them into her waist. If she leans forward a little onto them, they’ll act like a brace, stabilizing the raft (see Image 1).
The swimmer reaches across his cockpit, or just aft of it, with both hands and grabs the coaming on the far side. The rescuer grabs hold of the swimmer’s PFD shoulder strap (see Image 2). It’s better if the rescuer uses her “outside” hand for this (the hand farthest from the swimmer). She will be in a much better position to pull the swimmer out of the water and across the rafted boats. By reaching across with the outside hand, the rescuer twists at the waist, readying the large muscles of the torso for the pull.
The next step is quite crucial, especially if the swimmer is larger and/or heavier. The command from the rescuer is “1-2-3 JUMP!” The swimmer kicks his legs to the surface (see Image 3) and, on the word “JUMP,” pulls himself onto the raft. Simultaneously, the rescuer pulls on the PFD (see Image 4). Twisting at the waist provides a powerful pull—by leaning back, the rescuer can exert an even stronger effort. Under some conditions, it may be possible for the rescuer to place her free hand on the near side of the swimmer’s kayak to provide something to push off and to keep it fairly level when the swimmer comes out of the water.
In rougher conditions, the rescuer can use that free hand to keep the raft together. If the actions of both swimmer and rescuer are sufficiently coordinated, the swimmer will land well up on the raft face down. As long as the rescuer hangs onto the swimmer, the raft will keep together, and the rescuer can focus her efforts on helping the swimmer get out of the water and onto the kayaks. This can be a great benefit to a swimmer who doesn’t have good upper-body strength or has been weakened by cold water.

The rescuer directs the swimmer which way to turn to get into the cockpit. As the swimmer begins to slide into the cockpit, the rescuer holds the rafted kayaks together with one hand (see Image 5). It helps if the swimmer has practiced getting into the cockpit quickly so that the center of gravity is lowered as soon as possible. If the swimmer is not familiar with reentry techniques, the rescuer should provide directions with short, simple and direct commands. A swimmer is quite likely to be fearful and confused and in need of clear and concise direction. It may be possible for the rescuer to use one hand to hold the kayaks together and the other to help the swimmer into the cockpit to speed up the rescue.

Once the swimmer is back in his kayak, the rescuer must hold the two kayaks together (see Image 6). The swimmer will most probably need help attaching his spray deck. If the kayak has a built-in hand, foot or electric pump, then the spray deck can be fitted and the water pumped out. If there is no integral pump, and the swimmer is wearing a conventional spray deck, the rescuer can use a hand pump. This may be easy to do in calm conditions before the spray deck is reattached, but if there are waves breaking over the kayaks, it will be necessary to partially cover the cockpit with the spray deck, leaving a small gap at the side to insert the hand pump.
Pumping out a heavily swamped kayak is quite energy sapping. In the over-the-side speed rescue, both rescuer and swimmer can take turns at using the hand pump and holding the raft together. It’s worth trying to get out as much water as possible. A second capsize will be far more likely if there’s water sloshing around in the cockpit.

If the kayaks are facing in opposite directions, have the swimmer move to your bow and lean across it for support. Use a short tether to hold the bow of the swimmer’s kayak near your cockpit. If the kayaks are facing the same direction, have the swimmer move to your stern and hang on there while you short-tether his bow near your cockpit. With the swimmer leaning on and holding the bow or stern, he’ll be in a stable position, and you’ll be able to paddle by reaching over his bow.

Training Tips
Practice this rescue in calm conditions at first, then move out into rougher conditions. Consider wearing helmets to prevent accidental injury. Wear clothing that will allow you to jump into water with impunity. Time how long it takes from the rescuer arriving at the capsized kayak to getting the swimmer seated in his boat (without spray deck fitted). Twenty seconds in calm water is good. Fifteen seconds, and you’re getting it together as a team. Ten seconds is really slick.


One Paddler’s Achilles

On a calm July afternoon, Patrick Simard set out to paddle alone near his home in Victoria. Patrick is a skilled kayaker who likes to paddle for fitness. He has a good roll and has experience paddling and rolling a kayak in surf. He has taken a number of courses and clinics to keep abreast of effective paddling techniques and good judgment for sea-kayak touring, and over the past year, he’s concentrated on developing his offside roll.
His plan was to launch from Cattle Point and cross Baynes Channel to paddle out to Strongtide and Chatham Islands. The air temperature was about 70˚F, but the water was in the mid-50s, so under his PFD and spray skirt, he wore a 3mm wetsuit. The arms of the suit chafe a little, but Patrick puts up with it knowing that the sleeves of his suit will keep him warmer in the cold British Columbia water than a sleeveless Farmer John suit would in cold water.
The wind was calm, and the sea was smooth. Visibility was more than a mile through light overcast. The marine forecast was for continued calm weather throughout the day. The flood tide, pushing eastward from the Pacific Ocean and through the Strait of Juan de Fuca at a speed of two knots, accelerated as it curled around the southern tip of Vancouver Island. The tidal stream at Baynes Channel, well-known for its strong currents, would be running at about four knots at its peak.
Patrick launched from Cattle Point at 2:30 and headed along the Vancouver Island shore, then across Baynes Channel to Strongtide and Chatham Islands. The crossing was uneventful, and Patrick had only to make a small ferry angle to compensate for the current. After a short time exploring the shores of the islands, Patrick headed back across Baynes Channel. The tide was now flooding near its predicted maximum of four knots, and Patrick had adjusted his course to the west to make a good ferry angle that would set him on a course back toward Cattle Point.
A sea-going tug crossed Patrick’s path, and he set up to surf its wake. The waves were only two feet tall and didn’t provide much of a ride. Patrick was relaxed and unconcerned about the tug’s wake. After it had passed, he noticed a larger wake closing in on him from a different direction. Three feet tall with a breaking crest, this wake promised a better ride. The tidal current probably contributed to the wave’s steep slopes and slightly breaking crest. The source of the wake was a mystery—possibly a large freighter out in the shipping lane.
Before Patrick had time to set up for surfing, the wake hit him broadside on his right. Patrick let the crest pass beneath the kayak, but the back side of the wave was surprisingly steep. Patrick began to capsize down into the trough and prepared to high-brace into the trough as the kayak slid down the back of the wave. He had to reach well down with his paddle to reach the water. He capsized only far enough to dip his shoulder in the water; his brace kept him at the surface but didn’t right the kayak. After a quick sculling stroke to hold him at the surface, he put additional effort into a second attempt to high brace, but he lost his grip of the paddle from his right hand and capsized fully. Something had happened to his right arm. He released the spray deck and exited his kayak. He emerged and held onto his kayak with his left hand. His paddle was floating nearby, and as he reached for it, he realized that he had dislocated his right shoulder.
While in the water, he assessed his situation: He could see the tug that had made the smaller wake heading away. A sailboat, the only other vessel in the area, was also heading away from him. Although his right shoulder was badly injured, it wasn’t very painful for the first few minutes; however, with the joint between his upper arm and shoulder now distorted, his arm and hand were weak and unresponsive.
He tried to keep his injured limb very still—he held onto the boat with his left hand and held the paddle with his weakened right hand. The flooding tide was pushing Patrick out of Baynes Channel into the open waters of Haro Strait. He drifted in the current for about 15 minutes before he saw a sailboat under power approaching him from the northwest. With only one good arm, it was very difficult to hold onto the kayak and raise his paddle above the surface to signal for help, but fortunately the sailboat responded to his signal and altered course toward him. By the time the sailboat reached him, Patrick had drifted a mile or more from where he had capsized and was approaching the much-less-traveled waters bordering Haro Strait.
The skipper of the sailboat put a boarding ladder over the side, and Patrick passed over his kayak’s bow line and began the difficult task of getting up on the first step of the ladder. He had been in the water for 30 minutes but was still comfortably warm, and although he was seriously disabled, he was not in excessive pain. With Patrick and his kayak aboard, the sailboat skipper headed to shore for the emergency medical treatment that Patrick needed.
Patrick felt cold and began to shake. The pain of the dislocation increased rapidly, and his hand had grown numb. The sailboat’s small motor struggled to make progress against the current. It took another half hour before they made it to a marina in Oak Bay. At the dock, Patrick’s kayak was locked up securely before his rescuer drove him to a nearby hospital.

Lessons Learned
When we are close to home and out for an afternoon of paddling, the familiar surroundings tend to lower our perception of risk, especially if we know that emergency rescue services are readily available. Patrick had often paddled to the Chatham Islands, and for him there was nothing unusual about paddling alone across that busy channel in a current running up to four knots. This section of the Victoria shoreline is a popular area for experienced local paddlers to practice their skills, and many make the crossing of the channel to the Discovery Islands. While the area is considered by many to be the local playground, it has also been the scene of a number of kayaking accidents.
Patrick now feels that he was lulled into a false sense of security by the familiar and seemingly benign circumstances and was not sufficiently alert at the time the breaking wave arrived. He recalls being very relaxed at the time he capsized and believes that his nonchalant response to the approach of the wake resulted in a poorly executed high brace and the subsequent disabling injury.
To his credit, he had reduced the risk of cold-water immersion by wearing a wetsuit. He had also taken several kayaking courses and had practiced his skills to the point of feeling prepared to perform a self-rescue if it became necessary to do so. His training contributed to his ability to remain calm throughout his capsize and wet exit, but he was unprepared for the injury to his arm and the obstacle it created in getting back in his kayak.
Many of us train and practice to be stronger, more skillful kayakers, but fail to consider the possibility that we may be incapacitated to some degree by injury, illness or exhaustion. We regularly make a risk assessment before we depart the beach based on weather reports and tide tables, on the gear we have with us and on an assumption of normal health and fitness. Chronic or traumatic injuries to a wrist, elbow or shoulder are infrequent but common to sea kayaking. The possibility of injury should be taken into account in our training and in our assessment of risk.

Coping with Injury
It’s common to practice bracing and rescue skills in rough sea conditions, but generally we don’t practice techniques to perform self-rescues while simulating injury or other impairment. The training regimens among Greenland kayakers include a long tradition of preparing for the possibility of injury or entanglement while hunting. To recover from incidents similar to Patrick’s, they developed rolls that kayakers could do with one arm. While the variety of Greenland rolls may not be possible to perform with contemporary kayaks and euro-paddles, practicing wet exits and reentries using just one arm could provide valuable insight into coping with an injury. It would be best to learn to deploy a paddle-float or stirrup with one hand in a practice session when you’re not in a survival situation. It’s also very important that paddlers have the mental preparation and decision-making capacity to make the most of these special techniques at the time they’re needed. 

Practicing Mental Preparedness
Capsizing into the trough of a steep wave is not uncommon. A sudden high-brace into a deep trough can place a great deal of stress on the shoulders. After a failed brace or roll, the paddler’s shoulders are again at risk, as a second attempt to high brace is often aggressive and forceful and done from an awkward position. If you find yourself faced with a situation that requires a difficult high brace, allowing yourself to capsize and roll back up can be a more controlled and safer response. Patrick thinks he could have avoided the injury by not struggling to high-brace. He feels certain that relaxing, allowing himself to capsize, then rolling up would have been a simple, easy and successful alternative. Frequent practice of rolling and bracing in a wide variety of paddling conditions will help you stay relaxed and confident and better able to set up and execute a safe and controlled roll, with elbows low and close to the torso.
Physical skills are only useful when mental control is present. Practicing the mental skills that allow us to assess situations, choose plans of action and implement our best bracing, rolling, wet-exits and reentries when we need them. Practice sessions that simulate injuries, distractions, changing circumstances and limited performance times provide an excellent way to develop the mental agility necessary for effective rescues under difficult circumstances. Frequent practice will help us make assessments and decisions quickly even while under considerable stress.
Patrick had practiced wet-exits and reentries but had not prepared himself to respond to an unexpected injury. After his capsize in Baynes Channel, he didn’t think to use the pig-tail tow-line he was wearing to secure himself to his kayak, leaving his uninjured arm to raise the paddle or reach into the kayak for emergency equipment. Just as it is with physical skills we practice, the mental techniques we practice diligently will be the ones we have available at the time of unexpected circumstances.
It took three months of rest and rehabilitation before Patrick’s shoulder was strong enough for him to paddle a sea kayak. He is now paddling again, but he takes his local waters more seriously now and carries flares and a marine VHF radio.

The shoulder joint is formed by the junction of three bones: the collarbone (clavicle), the shoulder blade (scapula) and the upper-arm bone (humerus). The rotator cuff is the name given to the group of muscles and tendons that form a cuff that holds the head of the humerus in the glenoid fossa, a shallow socket in the scapula.
The structure of the shoulder joint provides an extraordinary range of motion. The only contact between the bones of the shoulder and those of the torso of the skeleton is at the joint between the clavicle and the top of the sternum, so the integrity of the shoulder joint comes almost entirely from the muscles that surround it. By allowing a wider range of motion than any other joint in the body, the shoulder is less stable than other joints, and two types of shoulder injuries are infrequent but well-known among paddlers.
Shoulder dislocations occur when there is an injury to the joint between the humerus and scapula. Shoulder separations occur when there is an injury to the joint between the clavicle and the acromion, an extension of the scapula. When a shoulder traumatically dislocates, the top of the humerus is usually displaced below and forward of its usual position in the glenoid fossa (anterior dislocation). In far fewer cases, and unlikely in paddling-related injuries, the top of the humerus is displaced to a position behind the shoulder blade (posterior dislocation).
Typically, the significant pain of a dislocation starts about five minutes after the incident. The pain starts as a dull throb and gets progressively worse. Soon after the trauma, the muscles become tight and hold the shoulder in its injured position. The muscles begin to spasm, and the victim will not find any comfortable position for the arm. Without treatment, the pain can become overwhelming, leading to debilitating shock, if not unconsciousness. 

Treating Dislocations
Occasionally an injury to the shoulder may only temporarily dislocate the humerus and allow it to return to its original position within the shoulder joint. In this case, a supportive sling will serve to minimize discomfort and prevent further injury until medical help is available. If the humerus remains out of position, there are potentially very serious complications when treating the injury. The pain and the damage will grow progressively worse, and emergency medical assistance should be obtained as quickly as possible.
A hospital or appropriate clinic will choose the best of several procedures to relocate the humerus into its shoulder socket. As with setting a broken bone, the patient will be well-medicated to relieve pain and relax the tense and spasmed muscles. Advanced wilderness first-aid courses may cover field treatment of a dislocated shoulder, but believe me, I have witnessed four anterior shoulder dislocations, and all of the victims were in severe pain. Any field treatment would have been overwhelming and excruciating for everyone involved. Typically, victims cradle their injured arm and aren’t inclined to let any non-medical person move them. Some padding and a sling to support the arm in its existing position are likely the safest—and maybe the only—options available prior to transporting the injured paddler to a medical facility.
A long process of healing and rehabilitation begins after the dislocation is treated. The patient might be paddling again in three months, and it may take up to a full year to regain normal strength and a full range of movement. The shoulder may never be quite the same again. Patients who have sustained a shoulder dislocation can develop chronic instability and often suffer recurring dislocations. It may be necessary for surgery to tighten up and/or repair torn ligaments. 

Causes and Prevention
The shoulder is most stable when the elbows are positioned well below the shoulder and are well bent. The shoulder is unstable and prone to traumatic injury when the elbows are near or above the level of the shoulder. The shoulder is most vulnerable to dislocation when the elbow is at, or above shoulder level with the elbow behind the shoulder and the arm externally rotated (palm rolled to face upward). The leverage on the arm the possibility of dislocation is further increased when the arm is extended with a straight elbow.
Imagine driving your car with your left hand on the steering wheel and your left elbow by your side. Your right arm is extended and your right hand is hooked over the top of the passenger seat; your left shoulder is in a safe position—your right shoulder is not.
In a high brace, the wrists are above the elbows. Contrary to what the name of the brace suggests, the working blade should remain as low possible, and the hands shouldn’t be much above the shoulders. The forearm closest to the working blade should remain near 90 degrees to the paddle shaft, and the elbows should be well bent and near the torso. In a low brace, the same rules for the arms and elbows apply, but the wrists are below the elbows. The very common tendency in either brace is to extend the arm closest to the working blade. That only reduces grip strength and places the shoulder in an unstable and weakened position.
The remarkable range of motion in a shoulder provides us with the ability to manipulate a paddle and control a sea kayak. Deprived of that joint’s supple strength, our independent progress comes to a stop. We should all pay heed to our shoulders and routinely practice the best exercise and paddling techniques to keep our shoulders safe and strong.


An Eye on the Pole: Lonnie Dupre

The 16-inch steel-belted truck tire scuffs the gravel road and throws up a cloud of dust. Below, barely visible through a penumbra of agitated earth, the chilly waters of Lake Superior lap against the rugged shores of Minnesota.

Two hours earlier, Lonnie Dupre stepped from the warmth and comfort of his home and donned a waist belt and shoulder strap connecting the truck tire and harness to his 43-year-old body, and clambered his way up the steep hill he has come to know as well as the colors and curves of his own face.

Lonnie Dupre, explorer, sea kayaker and author of Greenland Expedition: Where Ice Is Born (Creative Publishing International, 2000), is in training for the first summer crossing of the Arctic and what could become one of the greatest polar adventures of modern times.

The Minnesota-born explorer, who started kayaking just 10 years ago, has already trekked the Northwest Passage, led a dogsled-and-ski expedition across 1,200 miles of Russia’s wild and untamed northeast, and together with Australian John Hoelscher, became the first to circumnavigate Greenland, traversing more than 6,500 miles of coastline using sleds and sea kayaks. The circumnavigation stretched over three separate visits, from 1997 to 2001, with Dupre and Hoelscher covering 3,442 miles by dogsled and 3,075 miles by kayak.

“That trip was amazing,” recalls Dupre. “It took a long time, but it was worth it.”

For explorers like Dupre, time is often the greatest adversary. And when it comes to polar adventures, days, even hours, can be the difference between success and failure, life and death. Which explains the rigorous training.

“I have to be fit and strong, physically and mentally, to make such a challenge,” says Dupre. “The hard work now will pay off when we begin the crossing, of which 30 percent is open-water paddling.”
Dupre survived nearly 8,000 miles of travel in unforgiving environments without serious injury, only to get knocked off his feet by a home-improvement project.

“The May after I got back from Greenland, I was working on a construction project at home,” Dupre recalls. “I fell 22 feet from my roof and landed directly on my feet among some landscaping rocks. I broke both ankles in two places and fractured my right tibia. I spent two months in a wheelchair and another few months on crutches.”

Dupre says that the injury won’t affect his upcoming expedition.

“I’ve been giving it a good workout,” he says. “Both ankles are fine, and I’m clear and good for the trip.”
The constant training also helps prepare Dupre’s wife Kelly for the long periods of loneliness that await her during each of Lonnie’s adventures. “I figure I have the easier job of the two,” says Kelly Dupre. “At least I have the comforts of home; Lonnie has to contend with the Arctic wilderness. This approaching expedition is a little more dangerous. But I’ve hiked with him enough to know he is really good at what he does.”

The Arctic Ocean spans some 8.5 million square miles at the top of the globe, plunging to depths of 14,000 feet. Despite the sub-zero climate, the ice plates are influenced by tides, currents and wind and are in constant motion. As the summer temperatures rise, the ice pans break apart and collide, creating wide corridors of open water that are littered with ice plateaus of various shapes and sizes. In addition to the dangers posed by shifting and melting ice, the region is frequented by polar bears searching for seals and anything else to satisfy their enormous appetites. Nothing screams “paddle faster” like an oversized, hungry polar bear running toward you across an icy wilderness where there’s nowhere to hide.

The logistics of such an expedition are almost unfathomable. One hundred and six days to cross a moving body of water and ice that is one and a half times the size of the continental United States.

Dubbed the One World Expedition, the trip will rely on a precise logistical plan and sophisticated satellite-based equipment to navigate safely through the treacherous maze of ice and water. “We each have about 300 pounds of weight to carry,” Dupre says. “Food, equipment and about five and a half ounces of fuel per day.”

Dupre and Eric Larsen, his partner for this epic voyage, will use kayaks for crossing leads and “slaks” (customized kayak sledges) for hauling cargo, both modified to be dragged across the ice. When they come upon open water, they’ll tow the slaks behind their kayaks using harnesses and ski poles. The prototype for their slaks was developed by Australian Eric Phillips.

Dupre and Larsen modified their kayaks by cutting off sections of the decks and attaching homemade spray skirts. “The skirt adds extra storage capacity while still shedding water as it’s being paddled,” Dupre says.

Dupre has been busy testing two types of rotomolded kayaks for the voyage. Because of the ever-changing surface (water and ice), Dupre has fitted his prototypes with durable plastic runners welded to the bottom of the kayaks, making them easier to tow across the ice while still enabling open-water paddling.

Dupre’s pull-and-paddle journey will serve as more than just the first summer crossing of the Arctic. “I’m just as interested about global warming issues as I am about becoming the first team to complete a summer crossing,” says Dupre, who has previously addressed the Fellows of the Royal Geographic Society in London about the environmental impact of global warming and shifting ice plates. “The Arctic is an important ecological sphere that needs to be monitored and protected, and the issue of global warming has dire consequences for us all. Our aim is to create awareness of the problem and collect relevant scientific data.”

Dupre and Larsen will also produce a documentary and book that will focus on global climate change, teamwork and the spirit of adventure.


Digital Navigation for Kayakers

If your dead reckoning is often dead wrong, computer-based resources can elevate kayak navigation to a higher level of accuracy and convenience.

For the past few years, I’ve been using “digital navigation” on my sea-kayak trips. My spouse tells me “digital navigation” is when she points in the direction she wants to go and says, “Let’s paddle that way.” What I mean by “digital navigation” is using personal-computer, Internet and GPS resources to plan, undertake, enhance and review kayak trips
.
This article will explain why digital navigation can be useful for kayakers, let you see what can be done with digital navigation and direct you to resources. I will assume familiarity with navigation, map and compass, GPS, personal computers and the Internet. Resources cited here apply to the United States, but similar—sometimes superior—resources exist in Canada, Australia, New Zealand and Europe. Many of the resources described in this article can be modified to provide useful service in other regions.

The focus of this article is on using digital navigation for sea kayaking, but because digital navigation has been evolving and expanding rapidly over the past few years, and to my knowledge, there are no primary or comprehensive information sources, this article will necessarily be incomplete and out of date. That’s the nature of our digital era. That having been said, this article should give you a good foundation in digital navigation and the resources to apply digital navigation to your own kayaking trips. As you consider how digital navigation can help you, you’ll need to decide what objectives are important to you, what computer resources, skills and aptitude you have, and how much time and money you wish to invest.

Traditional Resources
Traditional navigation is based on charts and maps—usually those produced by government agencies. “Charts” are nautical charts published by the National Oceanic and Atmospheric Administration (NOAA). “Maps” are topographic maps published by the United States Geological Survey (USGS). I like to use both charts and maps when kayaking.
Charts show the undulations of the coastline better than maps. Charts show water depths, glacial moraines, underwater rocks and mud flats. This information is useful to predict areas of rough water, dangerous passage, unusual currents or long beaches. Charts show lights and other marine navigation aids, as well as shipping channels. Maps, on the other hand, are much better at showing topology, such as streams, valleys, glaciers, mountains and, to some degree, even vegetation. These landmarks can be very useful for identifying possible beaches or water sources and to correlate the topography on the map to the landscape around you while you’re kayaking. The section line grid is useful for estimating distances. When hiking, maps provide the information you’d need to find a route to a mountain peak or through a pass.

Digital Resources
Digital navigation is based on digital charts and maps, a computer with viewing software, and a GPS with a computer interface cable. Digital charts are produced by companies such as Maptech, which makes high-resolution scans from paper charts published by NOAA. These charts are “raster” charts, meaning that the scanned charts consist of millions of dots or “pixels” of color. They are “bitmap” images similar to photographs taken with a digital camera. SoftChart also produces charts that appear to be identical to the official NOAA charts except for their high-contrast color. Maptech and SoftChart sell charts for $15 apiece or for $150-$250 for a bundle that includes approximately 100 charts covering a large area, as well as other navigation resources for the region. SoftChart also lets users download individual charts for $9 and lower resolution portions of charts for $5. Because charts often cover a large area, you may find that only a few charts will fulfill your needs. Or, you may find it more efficient to purchase a package of charts for your main paddling area.

Digital maps: The USGS creates digital maps by scanning paper maps at very high resolution, then resampling them and standardizing them as “digital raster graphics” (DRGs). The good news is that USGS DRG maps are available for free. Most states or regions have government agencies or universities that maintain geospatial libraries (including DRGs) that are available for download. DRGs also are available from commercial vendors. With a couple of clicks, it’s possible to download the .tif file (the digital map image), the .tfw file (which allows the map-viewer software to “georeference” the map image) and the metadata file (which provides lots of interesting information about how the map was created) for any DRG.

One problem with downloading DRGs is determining which map you want for an area. You can identify the appropriate quadrangle using standard paper USGS index maps or search for this information on the Internet. Some download sources access DRGs using the quadrangle name, but some sources access DRGs using only the USGS’s file name for them. In that case, you may need to convert the quadrangle into the USGS’s file name for the DRG map. DRG file names aren’t very obvious. For example, the DRG map for Alaska, Seward D-5 1:63,360 is named i60148g5.tif. Once you know this file name, you can either download the map file from a DRG source, or do a Google search to find the official USGS metadata file. The “distribution” section of that file will direct you to the actual DRG file, which can be downloaded from the USGS.

Beyond the awkward naming conventions of DRG files, the main problem with downloading DRGs is that the files are large. Downloads take a long time if you have a dial-up Internet connection. When uncompressed, each DRG consumes approximately 10MB of memory on your computer’s hard drive.

Downloading DRGs is useful for initial or occasional digital map needs, but for ongoing digital navigation use, I’ve found it more efficient and convenient to purchase a set of maps from a vendor. My favorite source is AllTopo. A set includes all topographic maps for an entire state or group of states in one package. Finding and accessing particular maps within the set is fairly easy. The set for Alaska, for example, consists of 11 CDs of maps (containing over 3,000 maps) and costs less than $100.

Viewing software: There are a number of programs that let you view and use digital charts and maps. I principally use OziExplorer, but other applications are available (included with the Internet resources on SK’s website—see link at end of article). Viewing programs generally cost less than $100. Bundled map packages and charts typically come with a viewer program, and free viewers are available. I decided it was best to learn and use one application rather than try to master several viewing programs. The commercial viewers generally have more features and capabilities than viewers included with bundled maps or available for free, but any of these applications may do all you want, and more. Because these programs generally deal with raster graphics in universal graphics formats, it’s generally possible to use a digital chart or map with any of these programs and to move charts and maps between these programs.

With the viewing software, you can open a particular chart or map just as you would a digital photograph or other computer file. What you see on the screen looks exactly like a paper chart or map. Unlike a digital photograph or other graphic image, however, the chart or map is “georeferenced”: The software knows the latitude and longitude and Universal Transverse Mercator (UTM, a metric and non-angular global mapping system) coordinates for every point on the map and screen, using the correct “datum” and map projection. You can zoom in and out and drag the image to view the portion of the chart or map that interests you.

Integration of Information

It’s difficult to retain information with traditional charts and maps. I have friends who carefully write information on their maps collected on trips or from other paddlers, such as good beaches and water sources, areas with hazardous currents or winds and sites with a lot of wildlife. However, these annotations fade with sun and rain and are lost forever if the map blows away during a crossing. When the map becomes worn or unreadable, there’s a lot of work and opportunity for error when transferring the information to a new copy of the map.
A digital map viewer solves this problem by providing for electronic annotations to a digital chart or map. The annotations become “permanent” for that chart or map. Whenever I work with a map or print it, I can choose the annotations that I want to display and print.

Waypoints
“Waypoints” are points or features on a chart or map having particular latitude and longitude or UTM coordinates. Charts show lights, buoys and other navigation aids. Maps are marked periodically at geographically important points with “triangulation stations” and “benchmarks” that correspond to specific points typically marked on the ground with a permanently fixed brass or aluminum disk. There are numerous other points I like to keep or capture as waypoints: beaches where I’ve camped, streams where water can be obtained, sea arches and caves, sea bird colonies, public use cabins, tide and current stations, artificial landmarks, archeological sites and other points of interest.
Viewing software and the Internet make it easy to mark, transfer, view and manage waypoints. For instance, while viewing a light marked on a georeferenced digital chart, I can create a waypoint at the correct latitude and longitude simply by clicking on the light symbol. I can edit the waypoint, pinpoint its location or add flash characteristics or other information to the waypoint’s description. With a few more clicks, I can download all selected waypoints and descriptions to my GPS. Any standard handheld GPS can be used in conjunction with digital charts, maps and viewing software. All that’s required is an interface cable to communicate between the GPS unit and the computer. These cables are supplied with many GPS units or can be purchased separately for about $20.
A map printed with waypoints lets me associate the waypoints in the GPS with topographical features and locations while I paddle. I can display and print the light waypoint on a map, which wouldn’t otherwise show lights. Going the other way, I can mark a triangulation station waypoint on a map and view and print it on a chart.
Waypoints can be created with a GPS. When kayaking, I usually take a quick GPS waypoint at each beach, rookery, stream and other feature I want to remember. When I get home, I connect the GPS to the computer and, with a few clicks, upload the waypoints from the GPS to the computer and display them on a digital chart or map.
After waypoints are created by or uploaded to the viewer software, they can be saved in digital files that can be organized in any way you find helpful. I have one file that includes waypoints created by my GPS on past trips, separate files for each individual trip, another file for tide stations and miscellaneous files for other types or sources of information. When planning a trip, I open the appropriate waypoint files to evaluate the available information for the area. Right before a trip, I print a map for the area showing the waypoints, which I also download to my GPS. Since a waypoint file is a standard format text file, I can store, manipulate, annotate and export them using a spreadsheet program.

Tracks
Occasionally, I leave my GPS on while paddling and record a “track” or line of travel. I then upload the track to my viewer software and can see the track displayed on a chart or map. Besides being entertaining, this exercise can help sharpen your dead-reckoning senses. If the track shows that you were drifting to the right while making a crossing, you can ask yourself, “Was I aware I was drifting? What should I have done to compensate for the drift?” Recorded track data can be analyzed to calculate average speed and other time-distance functions. Tracks can be saved on the computer as a digital file and displayed on a chart or map whenever desired.
More often, I create tracks manually. I do this for two reasons. While trip planning, I use the computer mouse to draw tracks along possible routes, into bays and across channels. A display lets me know the distance covered by each possible route. This is quite a bit easier and more precise than using a set of dividers or some string.
After returning from a trip, while the route is still fresh in my mind, I manually create tracks (or upload recorded tracks) that trace my trip. I can compare the actual distance to the estimated distance and time spent paddling. These tracks also serve as a diary of the trip. (See Illustration 3.) Since the tracks can be kept as separate digital files and recalled at will, it’s possible to look back at a trip taken years previously to remind yourself where you paddled and camped.

Enhancing Resources
Several aspects of digital navigation can enhance what’s available with traditional map and compass. One problem with large maps is the difficulty of determining latitude and longitude when the map is folded into a usable size. This problem is partially solved by printing the digital map to a usable scale and size. Also, viewing software can print latitude and longitude or UTM grid lines on any map. This makes pinpointing locations on a map much easier when used with a GPS.
Charts have compass roses on them, which show the direction of magnetic and true north. This allows for simple map and compass work in the field. However, roses may not be printed near the portion of the chart where you’re paddling, and they aren’t printed on maps at all. Because charts and maps often don’t have readily visible north-south lines (especially over the water), I often draw vertical lines on paper charts and maps to make it easier to align a hand compass due north. Some people prefer to draw angled lines on the map or chart corresponding with magnetic due north.
Once a chart or map has been created as a digital image, manual aids to field navigation can be placed on the chart or map electronically using practically any software that can read standard graphics files and draw lines and circles. Photo-editing software, CAD applications or even some word-processing programs can be used to add compass roses, true-north lines and magnetic north lines. You also can rotate the digital map image, which might be useful if you’re paddling in a fjord or along a coastline. Rotate and crop the map image so that the fjord or coastline is aligned with the long axis of your paper to maximize the useful information on the page. (Refer again to Illustration 1. This map file includes examples of magnetic north and true-north lines, a compass rose, waypoints, annotations, latitude and longitude, etc., all of which have been added to the map file digitally.) 

Name Search
Has anyone ever said, “Let’s paddle to Perry Island next week,” you said “Great,” and thought “Where the heck is that?!” The Geographic Names Information System will solve your problem. This collaboration between the USGS and the U.S. Board of Geographic Names is a database of over two million physical and cultural geographic features in the United States, by name and location. If I type “Perry Island” into a map-viewer program, it’ll search the database, identify every map or chart on my computer that contains Perry Island, and display Perry Island on a map or chart on my computer screen. So that’s where it is! The Geographic Names Information System is also available on the Internet, and once the feature is located, it provides links to view and download the appropriate DRG.

Scanning Maps
One interesting feature of using raster maps is that virtually any paper map can become digital. Scan a map into the computer as a graphic image. Using a viewer program, designate the method used to “project” or draw the map in two dimensions and the “datum” used by the map to describe the shape of the world. Finally, define the location of a few points on the scanned map image by latitude and longitude or UTM coordinates. These points can be based on known locations, such as benchmarks or GPS readings. The viewer software then uses complicated formulae to georeference the map. At that point, the scanned and georeferenced map can be just as useful and accurate as a digital map purchased from a digital map supplier.
Why go to this bother? You may own several paper maps that you’d like to utilize rather than buying new digital maps. You may find that no digital map is commercially available for your area of interest. You may have a paper map of an area that’s too specialized to warrant commercial digital distribution, such as a map published by a local birding organization showing special information about shorebird nests and migration routes. You may want to navigate using recent aerial or satellite photographs of an area rather than an outdated digital map. Most digital charts and maps are based on paper charts and maps and are thus no more accurate than their paper ancestors, which may be based on decades-old data. In areas with relatively rapid geological or geographical change, using a georeferenced aerial or satellite photograph as a map may be a very useful navigation tool. 

Attaching Files
In many viewers, you can attach other files to waypoints or other features. If you want to remember what your camping beaches looked like, just take a photograph of each camp and attach it to the waypoint for each beach. In the viewer, you can click on that waypoint and display the photograph. Other possible attachments could include a tide table, the view from the beach, a daily diary or recorded sounds. 

High-Bracing Drills

Down but not out. A high brace will bring this paddler back up before he’s fully capsized.

Bracing is a skill that many intermediate paddlers learn once they’ve grasped the basic power and steering strokes. Although there are several bracing techniques, the two typically performed are the low brace and the high brace. These two techniques can be used in a variety of paddling situations and can provide support in rough conditions and when the boat is edged over aggressively for quicker turning.
The low brace is often learned first, as it’s a bit more instinctive and the transition from a normal paddling stroke to the low-brace position is easier. A low brace works well if the boat is only tipped at a fairly shallow angle and is not completely off balance. However, if the boat has tipped to such a degree that capsizing is imminent, a high brace is much more effective for preventing or even recovering from a capsize. In this article, I’ll discuss bracing in the context of its use as a recovery stroke (from a potential capsize) and suggest some exercises or drills that may help improve your high brace.

Hands and Faces
Before proceeding any further, a bit of terminology is required. When any paddle stroke or skill is performed, there’s an inboard hand and outboard hand. The outboard hand refers to the hand closest to the paddle blade used to perform a stroke. For example, if I were to take a forward stroke on the right side of the kayak, the outboard hand would be my right hand. The inboard hand would be my left hand, the hand farthest from the blade in the water, the working blade. In describing the paddle blade, the “power face” is the face of blade that’s typically concave and faces the stern of the boat if you’re holding the paddle normally out in front of you. The opposite side of the paddle blade is referred to as the “back face.”
To set up properly for a high brace, your wrists are positioned above the elbows such that the power face of the working blade is parallel and facing the water surface (just prior to actually making contact). As the boat goes off balance, the power face of the working blade works against the water resistance to provide support to allow you to perform a hip snap and bring the boat back to a stable position. One of the most important elements of a high brace is keeping your elbows in close to your body and low. If you allow your outboard elbow to come up above your shoulder and behind your head, you’re exposing your shoulder joint and making it vulnerable to a dislocation. Be very careful when performing the drills here to keep your elbows forward and below your head.

There are a few problems I frequently encounter when helping someone learn to perform a recovery high brace. The first problem is related to the positioning of the inboard hand and arm. The second is that many paddlers don’t learn how to perform a recovery high brace effectively because they rarely commit to completely capsizing while practicing. Finally, many practice bracing from a stable setup position rather than attempting to simulate real-world paddling.

It’s often said that the primary reason for practicing paddling skills such as bracing or rolling is to make it a reflex action so that when you really need the skill, you can instantly perform it without thinking about the details. In the case of rolling and bracing, you need to overcome the natural instinct to get your head out of water to get a breath of air. As those who know how to roll or are learning to roll have discovered, one of the keys to a successful roll is to have your head come out of the water last, even though that goes against your natural reflex to breathe. Similarly, when learning to perform a recovery high brace, you may have to fight the impulse to brace too soon, that is, before you’ve tipped over far enough that a brace is even necessary.
For the past several years, I have assisted a friend in teaching a beginner class, so I’ve had the opportunity to witness a lot of people capsize in a kayak. One thing I’ve noticed is that, in almost every case, paddlers capsize in the direction in which their paddle is in the water. Typically, they’ll try to stay upright by leaning away from the water to keep from going in, as in Image 2. This is a natural reaction for novices—if they’re about to fall in the water, the instinct is to avoid going in by leaning away from it. They will also push down on the paddle, but it’s usually at an angle that will only cause it to go deeper in the water.

Most of these paddlers will learn how to perform a high brace and may even practice it often, but the technique they use may only work when the boat is only partially tipped over, as it is during an edged turn. Typically, paddlers will tilt the boat with their hips but try to keep nearly centered over the boat. From this position (often referred to as a J-lean), a quick slap of the power face timed with a hip snap brings them back to a fully upright position. That same technique may not work as well when a high brace is used for recovery from getting knocked down to the water. Fortunately, there are several exercises or drills you can use to develop a high brace that will work well when the going gets rough.
When you’re using your paddle for a high brace, think of it as a lever. Sit on the floor, holding your paddle horizontally about chest high and your elbows tight against your sides. Touch the right blade to the floor by raising the left (inboard) hand, using your right (outboard) hand as a pivot point. Notice the angle of the paddle shaft. Now try the same exercise, but keep the left (inboard) hand fixed and touch the right blade to the floor by lowering the right hand (pivoting off the left hand). Again, note the angle of the paddle shaft. As you can see, if you allow the inboard hand to come up, the angle of the paddle shaft is more vertical. If you were to try to brace with the working blade at this angle, it would provide so little support that it’s no more than a pointer indicating the direction you will likely be falling: down. Using the outboard hand to bring the working blade to the water and keeping the inboard hand stationary, or anchored, will keep the blade at a shallower angle and provide a more effective brace.

Queen Anne’s Salute
Queen Anne’s Salute is an exercise I’ve found useful not only for creating a more efficient paddle angle for a high brace, but also for forcing the paddler into a position where a recovery stroke is mandatory. In Image 3, the paddler is in the starting position for the salute.

Notice that his outboard hand is down near his hip, upper hand is low, and the power face of the paddle is oriented such that if he were to capsize to his left side and keep the paddle in this position until his head hit the water, the paddle would be in an ideal position for a high brace, as shown in Image 4. When the paddler hits the water, the paddle will be horizontal with the water surface.

While the Queen Anne’s Salute is a good exercise for forcing a capsize and putting the paddler into a good set-up position for a deep high brace, rarely will you find yourself in the Queen Anne’s Salute position during normal paddling.

Deep High Brace
The next exercise describes how to get into the ideal position for a high brace from a normal paddling position. Essentially, the goal of this exercise is to try to put your head in the water before your paddle hits the water surface. I call this a deep high brace. The sequence in Images 6a-6e demonstrates this exercise.

The key to performing this exercise is to move the outboard hand up and across in front of your face as you capsize. As in the case of a high brace from the Queen Anne’s Salute position, the brace is performed using the inboard hand as a pivot (or anchor) point while pulling down with the outboard hand and timed with a vigorous hip snap.
Once you’re able to perform a deep high brace, there are several variations that can be added to help make it more reliable in “real” conditions. Try holding the working blade just a couple of inches above the water surface with the power face down. Capsize toward the paddle and bring the outboard blade up as you go over. Essentially, try to keep the working blade from entering the water until after your body has hit the water. The paddle shaft should be nearly horizontal at this point and ready for a brace.

Linking Braces and Strokes
To practice a deep high brace in rough water conditions where waves might be hitting you from both sides (clapotis), try performing a recovery brace on one side then fall over to the other side and perform a recovery brace. Go back and forth a few times or fall over to the same side twice, then go to the other side. Some people practice bracing in this manner by having a training partner at the stern of the kayak randomly twist the boat in one direction or the other to force the paddler to brace on both sides.

Try performing a deep high brace while on the move. Paddle forward a bit, then without changing the cadence of your stroke.After you’ve braced successfully, don’t just sit there and admire your work, but continue paddling forward or perform some other kind of stroke (perhaps a recovery brace on the other side). When paddling in real conditions, if something has knocked you over, typically your first priority is going to be to get away from whatever it was that caused you to capsize.

Try the deep high brace from a variety of starting positions. Paddle backward, fall over and brace back up. Paddle forward, perform a low brace turn, then as you’re about to finish the turn, fall over, flip the paddle over and perform a high brace.

Back Flop
For the last exercise, try delaying your hip snap and brace after your body has hit the water. When you have capsized, you’ll find that there’s a short period of time when your capsize momentum is interrupted as your body makes contact with the water surface. If you’ve ever jumped off a diving board, you’re probably familiar with a dive known as the “belly flop.” If you’d done a nice vertical swan dive, you’d usually end up near the bottom of the pool. However, if you’re unfortunate enough to perform a well-executed belly flop, you likely will end up only a foot or so below the surface. The greater surface area you present to the water, whether you’re diving or capsizing, the more it will slow you down.
As you start to capsize, try rotating your torso so that your back hits the water fairly flat, then wait for the water to slow you down before you perform a hip snap and a high brace. Instead of diving in with your head as you capsize, as demonstrated in the deep high brace earlier, try to perform a “back flop.” Image 8 demonstrates how the paddler has rotated his torso as he capsizes. Notice that his paddle is in an ideal position for bracing once he hits the water, and his body is coiled to provide power as it unwinds during the brace.

f you practice these drills often enough, eventually your instinct will not be to lean away from the water if you’re about to fall over, but to get into a position that’s most effective for a recovery brace. Once that happens, you may find that you almost never need to roll because you can recover using a high brace. While rolling is always an important skill, a good high brace will prevent a complete capsize and often provide a much faster recovery from a loss of balance.
In summary, keep that outboard hand low. A high brace is much more effective when the paddle shaft is horizontal with the water surface. After you’ve mastered the skill in calm conditions, try it in progressively rougher water. The best way to learn a recovery high brace is to create a situation where a high brace is mandatory. If you make your high brace bombproof, you may never have to resort to your bombproof roll.

The Palm Pilot – Out of the Office and Into the Dry Bag

I made the decision to buy a handheld computer reluctantly. Life in a two-earner family with an active five-year-old got so complicated that a better organizer was a must, so my wife and I both got Palm Pilot organizers. The Palm Pilots have worked very well to ensure that someone picks our daughter up from school—however, had I known how useful the Palm would be for kayaking, I would have bought one years ago.

A handheld computer for kayaking? Have you ever forgotten your tide table? Wanted to go for a moonlight paddle, but didn’t know when the moon would be full or what time it would rise? Have you ever needed to know when the sun sets to ensure making landfall before dark? Needed an alarm clock to wake up early to beat the wind? How about books to read or games to play or a word processor to write with when stuck in a tent waiting for a break in the weather? How about getting all of these things in a six-ounce package?

Although the Palm was developed to provide a calendar, a notebook, and an address and phone book, its success is due to its tiny, shirt-pocket form, elegant interface, and the thousands of applications written for it. Although most of us go kayaking to avoid our calendars, notebooks, and address and phone books, many applications are wonderfully useful for the kayak adventurer.

Tide Tool is undoubtedly the most useful application for the paddler, and it is freeware—you can download it from the Web at no charge. You install the application onto the Palm by placing the unit in its cradle, which is attached to your computer, and “HotSyncing.” This procedure keeps your calendar and contact information synchronized between your desktop and your Palm; it can also load new applications. When you install Tide Tool, you can choose to load the areas you need. I have the East Coast from Canada to Venezuela, plus the Caribbean on my Palm. I keep the West Coast, Europe, Australia and other locations stored on my desktop, available for future adventures. To use Tide Tool, you pick a location and date, then it calculates the present tide height (if today’s date is selected) and times and heights for high and low tides. The program will also calculate times and speeds for maximum flood and ebb currents, as well as times for slack current, and the speed at any given moment. To add icing to the cake, you can also get times for sunrise and sunset. Tide Tool can calculate all of this for the next 33 years, so the stack of printed tide tables replaced is impressive: My East Coast tide and current tables for only one year weigh 32/2 pounds; my Palm weighs only six ounces.

The current tide height can be especially useful. While my family was camped on Campbell Island on the Maine Island Trail last summer, my five-year-old daughter had to get up in the middle of the night. My wife went with her and called out that the water was lapping at the hull of our triple kayak. We had little room to move the 22-foot boat higher up on the pocket beach, so I grabbed my Palm, turned on the back light, and found that the current tide height was about six inches below maximum. We were just able to fit the boat against the trees on a patch of grass above the predicted high-tide line. Although we had tied the kayak to a nearby tree, we were glad to know we had now placed our kayak at a safe height, so that our pride and joy wouldn’t be bounced around on Maine’s abundant rocks.

Moon Info calculates rise and set times, as well as transit—the time when the moon is directly overhead—for any chosen date, based on location. Location (latitude and longitude) is easily obtained from Tide Tool for a nearby tide or current location, or from your GPS or nautical chart. Moon Info is shareware: You can download and try it for free, but you must pay a nominal fee unless you don’t mind the annoying reminders. If you find the application useful, you will be eager to reward the author.

If you enjoy star gazing when camping, you may have wondered, “What star or planet is that?” Star Pilot has the answer. After you enter your approximate location by selecting a nearby city, Star Pilot plots a real-time (or any selected date and time) star chart. Hold the unit over your head, turn on the back light, and glowing stars are shown just as they appear in the sky. (To obtain this effect on early-model Palms that do not back light with glowing text and objects on a dark screen, as the new models do, you can install Lighthack to reverse the polarity so that the stars glow, rather than appear as black dots on the screen.) Tap on a star and that area is enlarged. Tap again and a box pops up that names the object and provides information. Stars, planets, deep-sky objects and constellations are all easily identified. Star Pilot is shareware. It can be purchased in a very nice bundle with Moon Info, Sun, and J-Moons. Sun provides similar information as Moon Info, while J-Moons shows the position of Jupiter’s moons—handy if you brought your telescope! Although the phase of the moon is crudely shown in Tide Tool with a small image, Moonphase (freeware) shows a large display of the current or future phase of the moon, and is integrated with Moon Info.

Navigator consists of a two-ounce module that plugs into the base of the Palm with software that turns the Palm into a magnetic compass and allows downloading map images from the Web onto the Palm. This provides the kayaker not only with maps and a backup compass for navigation, but also with a portable, handheld compass useful, for example, for bushwhacking through the jungle on one of the Everglades’ Ten Thousand Islands.

The manufacturer of Navigator (which also provides electronic compasses to the major auto makers) also makes Weatherguide, another plug-in module that provides recorded temperature, humidity and barometric pressure data for analysis, graphic display and prediction on the Palm. Even if you never lose your VHF weather radio, at least you can answer the question, “How hot—or cold—was it in the tent last night?” The Weatherguide module records weather information even when it is disconnected from the Palm and, as a result, consumes its two AAA batteries in about three weeks, so you may want to remove them when you are not using the unit. The unit needs to be powered for one day to collect data before making weather forecasts.

Big Clock is freeware that functions as a large display clock, timer (up and down with alarms), and that much-needed alarm clock. Just remember to set the alarm sound to number four—out of four increasingly obnoxious choices—if you are a heavy sleeper.

ER-CPR is a great new application that leads you through real-time emergency CPR procedures. The program asks for the characteristics of the victim (whether unconscious, age, breathing status, etc.) and guides you through the CPR process step by step with timing beeps and other cues. If you are not familiar with a particular action you are directed to take, you can get detailed instructions or definitions by tapping “help.” The software comes with an extensive tutorial for your PC. Upon completion of the tutorial, you can gain CPR certification, if you desire. This is a must-have application if you travel to remote locations. It has both official sanction and rave reviews from the medical community.

A variety of readers are available to view documents formatted for the Palm Pilot (in DOC format). These range from minimalist freeware (CSpotRun), to shareware (Aportisdoc), some of which come with features such as the ability to view images (Tealdoc). A wide variety of free documents are available from the MemoWare Website. These include indispensable references such as First Aid Information, poems such as “The Cremation of Sam McGee” (to be read by the campfire), and classics such as Slocum’s Sailing Around the World Alone, The Wizard of Oz (for the kids), or the works of Mark Twain. Several vendors sell current best-sellers in DOC or proprietary formats. Newer models of the Palm have enough memory for ten or more full-length novels—a real space and weight saver on a long expedition.

This article is being written on my Palm using Fitaly, an on-screen tap keyboard developed for handheld computers. The most-used letters and the space bar are placed in the center of the keyboard, which reduces the distance between taps. This can result in a speed of 50 words per minute. The keyboard also moves itself or can be dragged to avoid the cursor. The other options for entry are Graffiti, a modified handwriting optimized for computer recognition that comes with the Palm, or use of an accessory keyboard. The GoType keyboard weighs just 11 ounces and is ten inches long, so it fits nicely in a dry bag, but is big enough to allow touch typing. The Palm itself weighs about six ounces so, together, your portable word processor weighs just over one pound. My hands are large, so I am a bit cramped on the GoType keyboard, but my wife loves it. A new, full-sized keyboard, the Stowaway, that folds into a 7.9 ounce package not much bigger than the Palm itself, should be available by the time this article is published. However, you might get away with the Fitaly on-screen keyboard. (In a recent speed contest, the winner achieved 65 words per minute, comparable to an average touch typist.) What this means to the weather- and wind-bound kayaker who is stuck in the tent is that the novel or story you never had time for can finally get written.

To write your masterpiece, you will also need software to edit large files. Two options now exist, with more on the way. QED works fine and takes only 25K of RAM. Smartdoc has more features and doubles as an acceptable reader (e.g., saving 44K for Tealdoc), but it consumes 120K. (Newer models of the Palm have two to eight MB of RAM but, for earlier models, memory requirements can be a serious issue.)

The final challenge is to get your document onto your desktop computer so that you can format and print it. Whenever you HotSync your Palm, you automatically back up your files, including any literary masterpiece. The backup file will be in DOC format. For your word processor to open it, it that must be converted to a Text file. Fortunately, converters are free and are available for both PC and Mac. Word processing on a handheld computer, which was just a dream a year ago, is now a reality, and a real boon to the self-propelled traveler.

If you like to keep track of your paddling or other forms of exercise, Workout Tracker makes keeping, and finding, your training log easy. You can add custom exercises; each exercise allows you to record a variety of user-specified information, including distance, time, pace, heart rate, weight, etc. You can even graph your progress.

If you get bored while sitting in your tent, hundreds of games are available, presumably developed for the executive who needs a few moments of relaxation or relief from the boredom of a long meeting. Game sounds can be turned off just for this purpose! If you are by yourself, your computer can most likely beat you at chess (Pocketchess), Chinese Checkers or Scrabble (Niggle). If you have a friend along, all of these can be played against a human opponent without dragging boards and pieces along. Games such as FlytrapFroggy, or Minehunt and Subhunt (that come with the Palm) will keep either you or your kids occupied.

For the foreign traveler, translation software is available ranging from dictionaries to a phrase book that allows the other party to point to an answer in his or her own language (Small Talk). Small Talk can be really helpful if you do not speak the language—especially on that kayak tour you have always wanted to take to Baja or Quebec.

Some excellent calculators are available that not only allow scientific calculations, but also conversion of currency or weights and measures. My favorite is Parens.

For the well-heeled geek, wireless modems allow you to check your e-mail while camped, or you can send your family and friends regular reports of your progress on your next expedition. The newPalm VII integrates wireless access by adding an antenna and about one additional ounce to let you engage in wireless web surfing and e-mail, as long as you are near a populated area in the U.S. Battery life is a real concern for these devices, so stock up if you intend to remain connected on your next trip.

How do you keep your Palm dry? A waterproof GPS case will work; mine provides additional room to fit either the compass or weather modules described above. Aquapac has just come out with a form-fitting case designed explicitly for the Palm that actually lets you use your stylus through its transparent plastic cover to write, using Graffiti. Thus, you can make notes while paddling without getting your paper notebook soggy.

The final issue is whether to stick with the Palm platform, which now holds more than a 70 percent market share, or to consider a WindowsCE device. These offer more memory, more power, and even color screens. However, at the moment, much of the most useful software for the kayaker—with the exception of word processing—is not available for WindowsCE. This is bound to change as more applications are ported to this platform every day.

At this point in time, all of these devices are power hungry, and measure battery life in days rather than the month obtainable for the Palm-based devices. Most Palm devices use two AAA batteries, but the Palm V and Vx recharge their NiCad batteries through their cradles, providing as much as a month of use. I prefer the AAA battery models because I use the backlight a lot to read books in the tent at night, and this use significantly reduces battery life. I carry extras.

Price is another reason to favor the Palm platform, since Windows CE devices typically run over $300. Several new Palm devices are priced at less than $200. In particular, both the Palm IIIe and the Visor—made by Handspring, a new company started by the original inventors of the Palm Pilot, who have licensed the Palm OS—are available for $179. These models have the newer, easy-to-read touch screens of the much more expensive Palm V family. In addition, the Visor has a plug in the back for a module that can add a variety of functions. Modules are under development to add a wireless modem, cell phone, and even a mapping GPS (HandyGPS). Palm is actively licensing their operating system.

IBM has had its own version of the Palm for several years, and another device aimed at the business user has just arrived from TRG. Several cell phone manufacturers, including the largest, Nokia, are working on integrating a Palm device, which means that you soon will be able to check out Tide Tool on your cell phone as well as to send wireless e-mail or browse the Web.

My guess is that many readers who have Palms have not thought about their usefulness for kayaking, and use them only for work. I find mine indispensable for both.